1
In this tutorial, we’ll create a complex glowing wallpaper using Photoshop.
We’ll be using custom brushes, several blending modes, lightning techniques, and blurs.
The tutorial was created using free resources, so you can easily recreate it by following step-by-step. To make it easy for everyone, we have included the PSD source file at the very end of the tutorial which should be great to use for quick reference.
Go ahead and try it out and post your examples in the comments area.
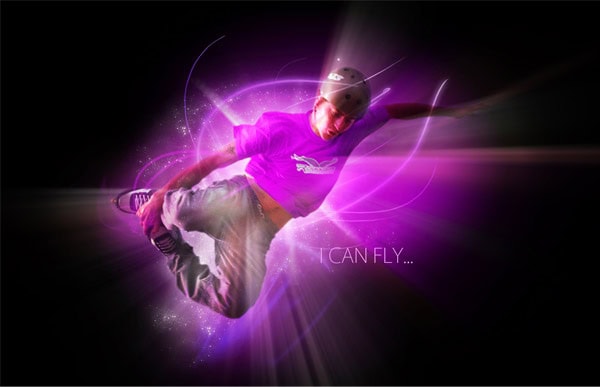
Here’s a preview of the final image….

Step 1
Create a new Photoshop document RGB, 1400 x 900 px. Fill the background with black. Then create a new layer, name it “BG” or something like that and fill it with a Radial Gradient (#55015F – #000000). From the center to one of the sides, as it shows in the images below.

Step 2
Select “BG” layer, then go to Filter > Distort > Twirl and set the twirl value to 250º. Hit OK and see how it looks.

Step 3
Now paste the main image, you can use any picture. This time I’ll paste this image of a roller guy jumping. As I’m very creative the layer’s name will be “Roller guy”.

Step 4
Now extract the guy’s shape, go to Channels, hide everything except the Blue channel then using the magic wand select the white background. Click on RGB layer on the Channels palette, then go to the Layers view again. Feather (and expand) your selection a few pixels and delete it.

Step 5
Now rotate and move the guy just a little bit to the left. Then go to Images > Adjustments > Curves and set the values below to decrease the output levels. See the image below.

Step 6
Next, duplicate the “Roller guy” layer, place the copy above the original on the Layers palette. Apply to the copy a Color Overlay (#9D0DAD) and set the Blending Mode value to Hue.

Step 7
Merge the “Roller guy copy” layer with a new blank layer. Then go to Layer > Layer mask > Reveal all and using a soft black brush, paint on the layer mask to hide the face, hands and pants. You should have something that looks like the bottom of the image below.

Step 8
Merge the “Roller guy” and “Roller guy copy” layers and name it just “Guy” (I’m putting those layers in a folder, duplicate and merge the folder). Now Dodge and Burn some areas of the “Guy” layer.

Step 9
Duplicate the “Guy” layer, convert “Guy copy” into a Smart Object. Next select the Smart Object, go to Filter > Blur > Radial blur, set Zoom as blur method and Best Quality and apply the same filter three times (Hit Command – Control + F to re-apply the filter once again). Finally, change “Guy copy” Blending mode to Linear Dodge (Add).

Step 10
Duplicate the “Guy” layer one more time, convert the copy into a Smart Object and apply the Radial Blur filter, but this time, move the Blur center a little bit to the left. Re-apply the filter a few times, move the “Guy copy 2” layer above everything else on layers palette, then change its blending mode to Linear Dodge (Add).

Step 11
Now download this brush set. And paint one single shape into a new layer called “Brush1”. Use this color (#E700FF).

Step 12
Add to the “Brush1” layer a gradient overlay using the colors shown below. Then put the “Brush 1” layer above the “BG” layer on layers palette. Finally add an Outer Glow filter.

Step 13
Now add a new light above the guy, use the brush shown below and use this color (#E700FF). Also add an Outer glow and change layer’s Blending Mode to Screen.

Step 14
Add two more lightening brushes with the same layer effect of previous step.

Step 15
Following select “Guy”, “Guy copy” and “Guy copy 2” and put them into a folder named “Flying Guy”, merge the folder, duplicate the layer and put it behind the original. Select Flying Guy copy and go to Edit > Free Transform, then reduce and rotate the guy just a little bit. Repeat that step as many times as you want.

Step 16
Now hide for a while all the guys layers, show the smaller one and apply a Layer Mask and fill it with a Radial Gradient Black – White. Repeat this with every single copy of the flying guy.

Step 17
Now we’re going to add a complex diffuse glow to make our design brighter. Change the Blending Mode to Dissolve on each Flying guy’s copy. Then down the Opacity of the copies to 75%, 70%, 65%, 60% respectively. Finally merge all the copies into one layer named “Flying guy copy” and put it above the “Flying Guy” layer or folder.

Step 18
Next, apply to the “Flying Guy copy” layer a Layer mask > Reveal all, then using a soft black brush, paint on a layer mask to hide some areas of the diffused glow.

Step 19
Hide the Diffuse layer for the moment. Now as a quick fix, to improve the lighting sensation, adjust the Hue / Saturation of the background “Brush 1” layer. Also add a white light behind the Flying guy using one of these brushes.

Step 20
To finish the diffuse glow effect, show the “Flying Guy copy” layer, add an Outer Glow (use the values shown below). Then goto Filter > Blur > Gausian Blur, set 7,2 as blur radius and hit OK.

Step 21
Now type some text somewhere on your design, I’m using Kozuka Gothic Pro typeface (#F3B1FB), then add an Outer Glow effect to the text layer.

Step 22
Finally use this brush set to add some white sparkles.

Final result
And that’s it! a simple and quick way to create a glowing conceptual wallpaper!.
Written exclusively for WDD by Alvaro Guzman
Have you tried the tutorial? Feel free to leave links to examples created using this as well as any feedback that you may have. Thanks…
20 Useless Websites to Waste Your Time
The internet is usually a place for “getting things done,” but sometimes the soul just needs a little bit of high-quality nonsense. These websites aren’t trying to sell you a…

Exciting New Tools for Designers, February 2026
There are so many new – and good – tools for designers out there right now. From tiny bits of artificial intelligence to icons that delight, there’s something to help…
Exciting New Tools for Designers, March 2025
Spring into action this season with new tools to boost your workflows, facilitate creative thinking, and help you be a more efficient designer. This roundup is packed with new goodies…
Compilation: 15 Hilarious Google Flops
When it comes to tech, Google has been synonymous with innovation, success, and world domination (hello, Android and Chrome!). But even the mightiest giants trip over their own feet from…
3 Essential Design Trends, January 2025
Happy New Year! If the website design trends we are already seeing are any indication, 2025 is going to be a great year for visual communication. This month’s collection of…
Exciting New Tools For Designers, January 2025
Welcome to our first tools round up of 2025. It’s the first Monday of a new year, and many of you are back at work after a much needed break….