1
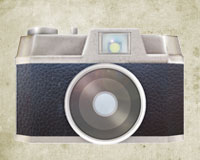
In this Photoshop tutorial, we’ll reproduce a fairly old camera: a Halina Super 35X.
We’ll use various tools and techniques to create a vintage camera from scratch, from the basic Marquee Tools (to create simple shapes) to the Brush Tool (for highlights and shadows).
The tutorial has 23 steps, and it targets users with average Photoshop knowledge.
It was created by Callum Chapman from Circle Box Creative exclusively for Webdesigner Depot readers.
Feel free to share links to your own results in the comments section below… Enjoy!
Final image:

Step 1
First thing’s first. Open up Photoshop and create a new document. I’ll use a Web Preset document at 800×600 pixels.

We’ll be referring to a source image of this Halina camera, one that I took using my iPhone.
Feel free to use it or one of any other camera—in fact, I encourage this because you’ll be able to more productively experiment with the tools and techniques that I’ll show you. The choice is yours.

Once you’ve saved the photograph, go back into Photoshop and go to File → Place. Locate your image and put it in the center of your document.

Rename the new layer (i.e. the one with the source photo on it) to something appropriate, such as “Source.” Lower the Opacity of that layer to 50%.

Step 2
Our document and source photo are set up and ready to go. Before we get into the fine detail of the camera, let’s create the main shapes of the camera to use as a guide.
Make a new layer and call it “Main Body.” Grab the Rectangular Marquee Tool and drag a rectangle over the leather part of the camera’s body, as seen below.

Fill your selection with black using the Paint Bucket Tool, making sure the “Main Body” layer is selected.

We can no longer see the camera, which is why we’re about to uncheck the visible layer of the “Main Body” layer. Once it’s unchecked, create a new layer called “Left Main Body.”
Grab the Rectangular Marquee Tool again and make a selection over the left side of the main body, and then fill it with dark gray. If you’re not sure what I’m talking about, see the images below.


Repeat this last step, this time selecting and filling the right side of the camera. Don’t forget to create a new layer!

With the visibility of all layers enabled, we should see something like this:

As with any design, this one starts off looking… well, pretty rubbish. That will change, though; don’t worry.
While holding the Command key, click on the thumbnail image of our layer “Left Main Body.” Before doing anything else, hold the Command + Shift keys and click on the thumbnail image of the “Right Main Body” layer. The outline of both items should now be selected.

Select the “Main Body” layer and hit the Delete key. This will remove unwanted areas of the main body shape. We could have just visually checked that our main body shape was right to begin with, but this way tends to be much more accurate.
Select the Polygonal Lasso Tool and, with the visibility boxes unchecked on all of our shape layers, make a selection as seen below.

Right-click and select Inverse, or go to Select → Inverse. This inverts our selection so that we can remove anything outside of our original selection, rather than inside.
Click again all of the visibility boxes next to our shape layers and one by one click on each and press the Delete key. You should end up with this:

As you can see, we now have the basic shape of our camera. The reason we did this in separate layers is so that we can be much more creative in applying textures to certain areas. For example, we will be able to apply transformed or warped textured images to just one particular area.
Step 3
Although we haven’t yet created much of the main shape of the camera, we’ll start adding texture to the main body.
I find it much easier to work on one area first and then move to the next step, rather than tackle it all at once. Head over to Bittbox and download one of these leather textures (I used the last one). Put it in your document by going to File → Place.

Shrink the texture; the easiest way to do this is by hitting Command + T and dragging the corners down while holding the Shift key to keep everything in proportion.

Holding the Command key, click on the thumbnail image next to our “Main Body” layer. Right-click and select “Select Inverse.” Click on your leather texture layer (you can rename this to “Main Body Texture”) and hit the Delete key.
Move the “Main Body Texture” layer down so that it is directly above your “Main Body” layer. You can see now why renaming your layers is important; otherwise they would get very confusing.

Go to Layer → New Adjustment Layer → Brightness/Contrast. Bring the brightness level down to -75, and the contrast up to +10. Make sure the adjustment is above your “Main Body Texture” layer, and hit Command + E on the adjustment layer to merge it down to your texture layer.
This basically means that the brightness and contrast settings will be applied only to the textured layer. Warning: after merging an adjustment layer down, there’s no readjusting it, so be sure to get it right before merging.

Place the texture in your document (again), and go to Edit → Transform → Skew. Lower one side of the texture, making sure it lines up with the angle at the bottom of the left side of our main body, as seen below.

Position your texture so that it completely covers the left side of your main body. While holding the Command key, click on the thumbnail image next to our “Left Main Body” layer to make a selection.
Right-click and click on “Select Inverse,” select our new texture layer and hit the Delete key.

After renaming the layer to “Left Main Body Texture” and moving it directly above the “Left Main Body” layer, add another Adjustment → Brightness/contrast layer, this time adjusting the brightness to -20 and the contrast to +10.
Merge the adjustment layer down to the “Left Main Body Texture” layer by hitting Command + E.

Repeat the last step, this time for the right side of the main body.

You might be thinking that the color of each side of the main body looks a bit off. Don’t worry; it will probably look much more suitable once the source photo is gone.
If it still doesn’t look right, we can touch it up later. Put all of your main body layers into a folder labeled “Main Body.” This makes things much easier to manage later on; otherwise we could end up with hundreds of unorganized layers.
Uncheck the new folder’s visibility. Now we can move on to the next step.
Step 4
The next thing we’ll start is the lens. Select the Elliptical Marquee Tool, and make a round selection over the lens.

Create a new layer, and name it “Lens Shape.” Fill your selection with light gray using the Paint Bucket Tool.

Hide the visibility of our “Lens Shape” layer, and make several more circles. Use appropriate colors to fill in each circle, and remember to make each circle on a new layer.
Call them “Lens Shape 2,” “Lens Shape 3,” etc. In total, I have five lens shape layers. Here is what it looks like with all of the lens shape layers selected, and further below with all layers selected:


Step 5
Select “Lens Layer 3” (this is my third circle in), and drag it down to the New Layer icon in the Layer Palette. This will duplicate the layer.
Hit the Command + T combination to open up the Free Transform tool, and in the menu at the top of your window, change Width and Height to 95%.

With the new layer still selected (it should be “Lens Layer 3 copy”) go to Layer → Layer Style → Blending Options. Apply an Inner Shadow using the following settings.

Repeat the last step until you have something that looks like this:


You’ll probably have around seven to nine new layers after what we just did, so put all those copied layers and the original into a folder labeled “Lens Shape 3.”
Step 6
Hide the visibility of all of your lens layers except “Lens Shape 1.” Go to Layer → Layer Style → Blending Options, and apply the following Gradient Overlay settings:

With the same layer still selected, duplicate it (as we did earlier), and reduce the height and width to 94%. Reopen the Blending Options, and darken each of the gradient colors.

We’ve covered a lot of the shaded and highlighted areas from these two simple gradients, but adding a little extra detail would be cool.
Zoom into the lens, and using a fine soft brush (using the Brush Tool) brush around some areas, as seen below. If you have a graphics tablet, this would be a good time to use it. Make sure this step is completed in a new layer labeled “Lens Highlights.”

Lower the opacity of your new highlight layer to 65%.

Repeat the last step, this time using a dark brush and painting in any shadowed areas. Do this in a new layer labeled “Lens Shadows.” Lower this layer’s opacity to 65%, too.

With all of our layers selected, here is what we have so far:

Step 7
Put all of your lens layers into a folder labeled “Lens.”
Create a new layer and name it “Inner Lens Shadow.” While holding the Command key, click on the thumbnail image of our “Lens Shape 2” layer, which is my dark gray lens circle.
In the new layer, go to Edit → Stroke, and use the following settings:

I used a gray that is a little darker than the original gray circle.

Step 8
Our lens is starting to look pretty good. Make another new layer and call it “Lens Reflection” (all new lens layers should be put in the “Lens” folder).
Grab a soft brush and use a light-yellow color (I used #fffae5). Paint over some of the lens, as seen below.

Go to Filter → Blur → Gaussian Blur, and blur by about 10 pixels.

Change the Blending Mode of the layer to Overlay, and lower the opacity to 40%.

Step 9
Create yet another new layer (I know, there are
a lot) and name it “Flare.” Reselect the outer shape of “Lens Shape 2” by holding the Command key and clicking on the thumbnail image of the layer, and fill the selection with pure black in the new layer.
Go to Filter → Render → Lens Flare, and use the following settings:

Change the Blending Mode to Overlay, and lower the opacity to 30%. Although this doesn’t make much of a difference, it adds that all-important detail.

Step 10
All we want to do now is add a little more texture to our lens. Create another new layer, and place in one of these textures. Scale the texture down, and place it over your lens.

Select the outline of the layer “Lens Shape 1” (you know how to do that by now), and select inverse. Hit Delete on your textured layer.

Change the Blending Mode to Overlay, and lower the opacity to 50%.

If you feel the urge, you can repeat this step using a different texture. And you can rub some areas out using a soft eraser brush.

Step 11
Select the layer “Lens Shape 1,” and open up the Blending Options by going to Layer → Layer Style → Blending Options. Apply the following drop-shadow:

Download one of these textures (I used the last one), and insert it into your document.
Position the texture beneath your layer “Lens Shape 5” (this is my actual lens, the glass bit).
Select the layer “Lens Shape 5,” select Inverse and hit Delete on your new texture layer (which I named “Bubble Texture”). Change the layer’s Blending Mode to Overlay.

After positioning the bubble texture over our “Lens Shape 5” layer, go to Layer → New Adjustment Layer → Hue/Saturation.
Increase the Hue setting to +180, and hit Command + E to merge the hue/saturation layer with our bubble texture layer.

Lower the opacity to 65%. Our lens is complete!

Step 12
We’re getting somewhere now! Let’s move on to the lower area of our camera.
Using the same technique we used earlier to get the main body shape (using the Rectangular Marquee Tool and Polygonal Marquee Tool), select three different layers: “Left Bottom,” “Main Bottom” and “Right Bottom.”
Place these layers in a folder called “Bottom.”

Make sure your layers are arranged correctly, and place them beneath your lens folder.

Step 13
Open up the Blending Options for your “Main Bottom” layer. Apply the following Gradient Overlay settings:

Repeat this step twice, once for each bottom side. Use the colors from your original source photo for maximum detail.

Step 14
Create a new layer and place one of these textures into it. Place the texture over your bottom layers, like so:

While holding the Command key, select the outline of one of your bottom shapes, and then holding the Shift + Command key, click on the remaining two shapes.
This should select all of the shapes’ outlines, leaving you with this:

Go to Select → Inverse, and hit the Delete key while your texture layer is selected.

Change the texture’s Blending Mode to Overlay. Now we’re done with the bottom section of our camera.

Step 15
This is what we have so far:

The camera is pretty obvious by now, which is good because we’ve already built a huge number of layers, the total file size coming in at over 4.3 MB.
From what we have already done, you have most of the skills you’ll need for the rest of this tutorial, so I won’t go into too much detail from here on in.
Create a new folder and call it “Viewfinder.” In new layers, create the following shapes using the selection of Marquee Tools, which we’ve used several times earlier.

Use the Polygonal Lasso Tool and the Select Inverse feature to cut out the proper shapes from our existing rectangles.

Step 16
Using the same technique that we used for the circles in the lens, create a viewfinder.
This is easier than it sounds: just use the Rectangular Marquee Tool to create several rectangles, and fill them in with different colors on different layers.

Step 17
Apply some Gradient Overlays to your “Main Viewfinder,” “Left Viewfinder” and “Right Viewfinder” layers.

Step 18
Using the same texture that we used earlier for the bottom of the camera, add some texture to the viewfinder area. Make sure to use the exact same settings.


Use the Brush Tool on a new layer to create highlights in your texture.

Step 19
Using the techniques you learned when making the camera lens, spice up the viewfinder with gradients, shadows and the Brush Tool. I used Inner Shadows on every rectangle, as well as strokes.
I used subtle gradients, the Brush Tool (to add some reflection on both sides of the viewfinder) and a lens flare.
To make the circle a little dirtier, I added 6-pixels worth of noise by going to Filter → Noise → Add Noise.

Step 20
Using the Marquee Tools, draw the remaining shapes of our camera. Remember to do each shape on a different layer, and name them appropriately.


Step 21
With our shapes done, it’s time to add gradients and textures to the main body (we’ll do the buttons afterwards). Use the same techniques that we used earlier.


Step 22
Using the Brush Tool with a soft brush selected, add highlights and shadows to our newly textured shapes.
Set the Blending Modes of all of the shadow and highlight layers to Overlay (the shadows should be in black, the highlights in white).
The first screenshot is what you’ll see after applying shadows, the second after the shadows and highlights.


Step 23
We’re almost there! Apply some Gradient Overlays to our two buttons.

Use the same technique that we’ve used several times now to add lighting effects to your buttons (i.e. the Brush Tool technique).

Add some texture to your buttons to finish things off.

Conclusion
After all that hard work, we’ve finally finished! We have one pretty detailed camera that can be used as a stock image, as part of a photo manipulation or even as an icon.
Experiment with the Hue and Color Balances (you can see my modifications with the color settings further below).
Compiled exclusively for WDD by Callum Chapman, a freelance designer from Cambridge, UK. He is the creative mind behind Circlebox Creative and Circlebox Blog, and can often be found writing for design related blogs.
What do you think of this tutorial? Feel free to share your own results below…
20 Useless Websites to Waste Your Time
The internet is usually a place for “getting things done,” but sometimes the soul just needs a little bit of high-quality nonsense. These websites aren’t trying to sell you a…

Exciting New Tools for Designers, February 2026
There are so many new – and good – tools for designers out there right now. From tiny bits of artificial intelligence to icons that delight, there’s something to help…
Exciting New Tools for Designers, March 2025
Spring into action this season with new tools to boost your workflows, facilitate creative thinking, and help you be a more efficient designer. This roundup is packed with new goodies…

Compilation: 15 Hilarious Google Flops
When it comes to tech, Google has been synonymous with innovation, success, and world domination (hello, Android and Chrome!). But even the mightiest giants trip over their own feet from…

3 Essential Design Trends, January 2025
Happy New Year! If the website design trends we are already seeing are any indication, 2025 is going to be a great year for visual communication. This month’s collection of…

Exciting New Tools For Designers, January 2025
Welcome to our first tools round up of 2025. It’s the first Monday of a new year, and many of you are back at work after a much needed break….