 Forget the clone stamp, paint bucket and pattern presets. When it comes to creating patterns, the ability to duplicate a layer is one of Photoshop's greatest features.
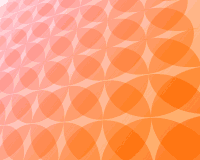
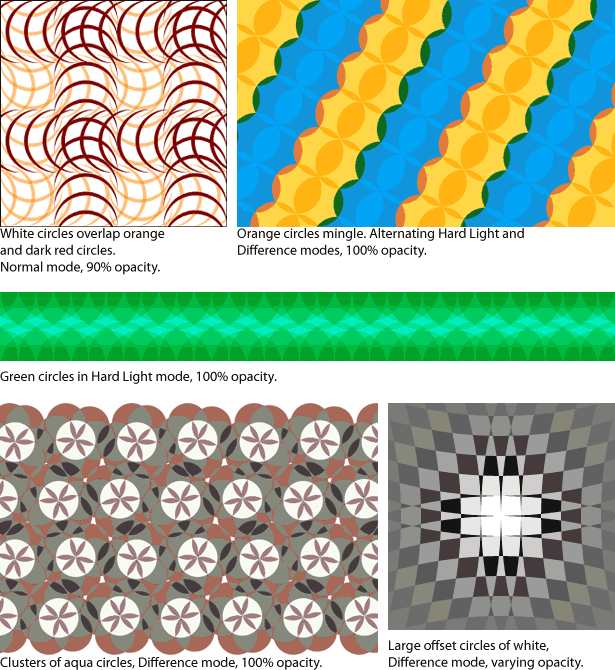
Semitransparent shapes can be very useful when creating repeated geometric “textures” of color and form.
They're easy to create, fun to play with and best of all, they can be uniquely yours.
In searching for interesting patterns, designers sometimes pass over basic shapes in favor of more complex geometrics. But simpler is often better.
The trick is to pay attention more to how shapes interact than to how a shape looks on its own.
The concepts are simple:
- As translucent shapes overlap, they create new shapes.
- Complex patterns emerge from apparently simple origins; and just like in a poem (a haiku, for example), there's room for variation within the prescribed form.
Unfortunately, it's easier to make a mess than a purposeful design. The trick is to identify which subtle changes might have consequences later.
One Origin, Many Destinations
When creating patterns that use opacity or blend modes, starting simple is best.
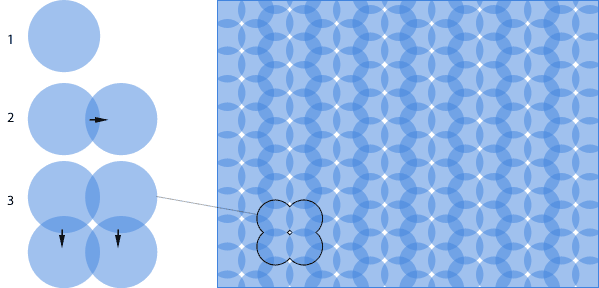
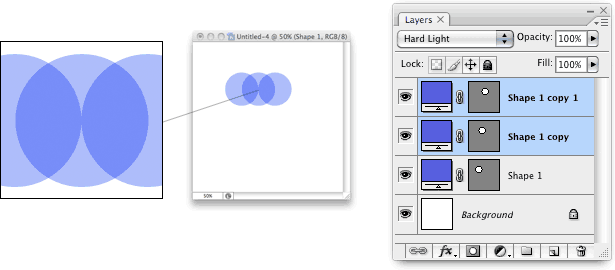
The pattern above was created with one circle in one layer. Here's the process:
- Set a circle (colored
#4184dein this diagram) to 50% opacity. - Hold down the Option (Mac) or Alt (Windows) key while using Photoshop's Move tool. The layer will be copied as the cursor drags. Their combined opacity will darken in the places where they overlap.
- Option + drag (Mac) or Alt + drag (Windows) both circles down and to the left—far enough to leave a white gap between each of the copies.
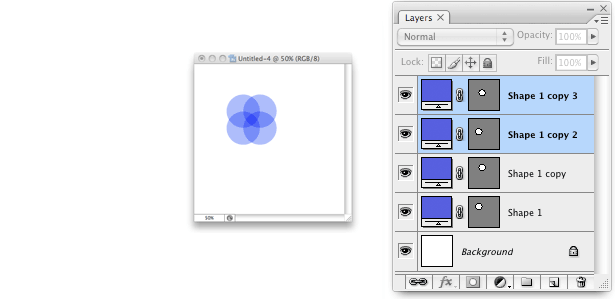
When repeated, a pattern appears.
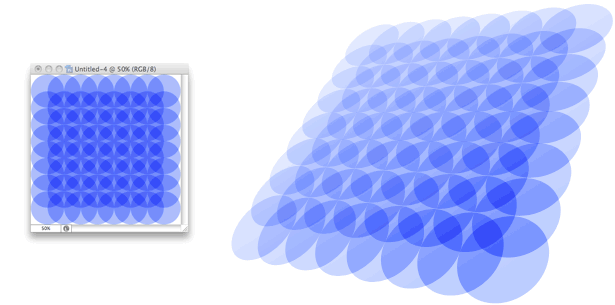
Patterns emerge from the way shapes overlap as well as from the shapes themselves. Clarity comes from simplicity: a pattern that begins simply looks better in the end. The circle in our last example can be used to create many patterns, including these:
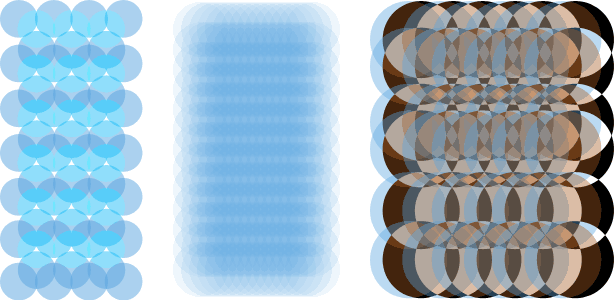
Each of these patterns was created with the same size of blue circles. Incredible variations in texture are possible with the simplest of changes; position, opacity and blend mode were the only changes made in the examples above. But "simple" doesn't always mean "easy."
Blend Modes
For pattern-making, 5 of Photoshop's 25 blend modes stand out: normal, soft light, hard light, overlay and difference.

When people think of complicated layer blends, "normal" rarely springs to mind, but its straightforward nature makes it the easiest to work with. "Normal" mode is the default setting, and it mainly has to do with the opacity settings of the layers. The colors of shapes and backgrounds blend according to their strengths. Normal could also be called the "blending" blend for its tendency to find average colors between the subject (a circle in the example above) and the items below it.
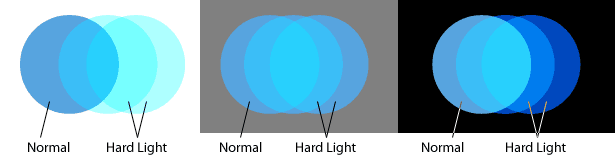
Hard light multiplies shadows and screens highlights. Layers set to "Hard Light," as in the diagram above, tend to tint everything underneath, which amplifies their original hue and saturation. If the layer contains dark colors, the layers below tend to get darker, and vice versa.
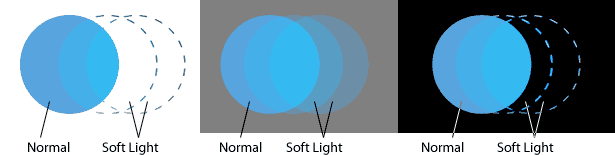
Soft light screens highlights and multiplies shadows without changing the blend color's luminosity. It works best when the underlying colors are neutral or have low saturation. Layers set to "Soft Light" have little impact against black and white, as shown above, but work well over pale blue and gray.
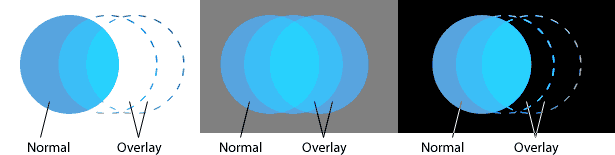
Overlay strengthens colors below a layer and changes hues to match its own. Layers set to "Overlay" (example above) are brighter than when in "Soft Light" mode but still don't affect rich black and pure white.

Difference is the least predictable blend mode. Layers in this mode generally invert tones in the layers below: lights become darks and darks become lights. Hues, however, become their opposite on the 360° color wheel: reds become cyans, greens become magentas and blues become yellows. The effect will vary depending on the colors and shades below whichever layer is set to "Difference" mode.
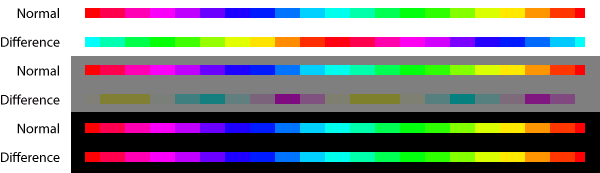
Above, a layer set to "Difference" mode over a white background completely inverts its colors. The same layer over a 50% gray background changes its hues 90° and muddies its tones. Over black, the "Difference" layer appears to have stayed the same.
Here's how they work.
Pattern-Making, Step By Step
As a simple example, we'll create a pattern based on circles. Regardless of shape, there are four steps: create a shape on a layer, give it a certain opacity and blend mode, experiment with a few copies, and mass-produce the pattern.
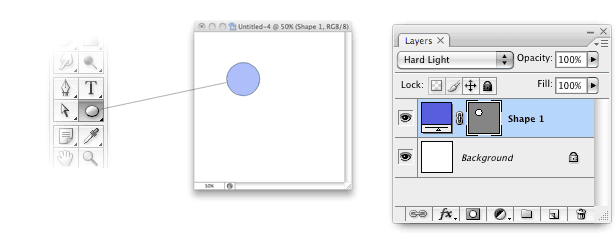
Step 1
Create a vector object with the Ellipse tool. Set the layer's blend mode to "Hard Light." Although any size and color will do, this example uses a 134x134-pixel circle, colored #575fdf. An image size of 600x600 pixels is a good place to start.
Step 2
Duplicate the layer with Command + J (Mac) or Control + J (Windows) or Layer → Duplicate Layer. Drag the copied layer to the right, to half of the circle's width. Alternatively, hold down the Option key (Mac) or Alt key (Windows) while using the Move tool. This will duplicate the layer as you drag.
Make at least two copies. In this example, each new layer touches the center of the previous layer. As a result, the other layers will barely touch one another.
Step 3
Select the first two layers and drag down the width of one-half circle. This is the same principle as step two, but down instead of to the right. When all layers share the same color, opacity and blend mode, you can create a repeating pattern simply by duplicating the layers in any order—or any direction.
Step 4
Repeat as desired.
Initial Decisions Affect the Outcome
The beginning is critical when creating patterns, because duplicating layers amplifies mistakes. The more copied layers there are, the more tedious fixing problems will be.
For example, let's say you decide to change every layer's opacity from 50% to 30%. That's one change per layer—and you can expect dozens, if not hundreds, of layers in a reasonably sized pattern. And what a change a few percent can make!
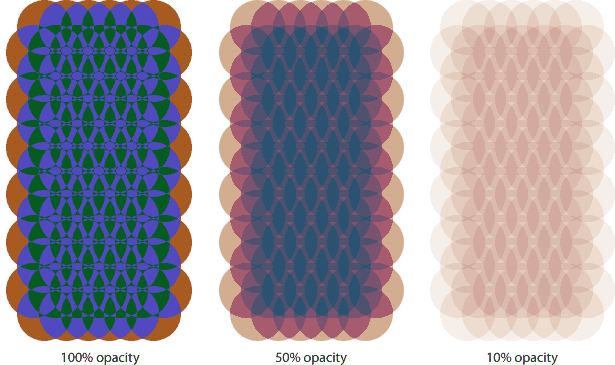
Each pattern above uses the same blend mode ("Difference"), same shape, same color and same placement, but different opacity. If you don't want to create an action, then you'll have to change the blend modes and opacities one layer at a time. Photoshop has a few shortcuts to expedite the changes:
- When the Move tool or any selection tool is active, the numbers 0 to 9 changes a layer's opacity. Type 1 for 10% opacity, 4 for 40% opacity, etc. Typing 0 sets the layer's opacity to 100%. This shortcut for both Mac and Windows works on just one layer at a time.
- When the Move tool or any selection tool is active, you can quickly change a layer's blend mode with these key combinations:
Mac Windows Blend mode Option + Shift + N Alt + Shift + N Normal Option + Shift + H Alt + Shift + H Hard Light Option + Shift + S Alt + Shift + S Soft Light Option + Shift + O Alt + Shift + O Overlay Option + Shift + E Alt + Shift + E Difference - Duplicate any single layer with Command + J (Mac) or Control + J (Windows).
Possibilities
"Keep it simple" isn't just a refrain: it's a requirement. These examples were all created with the same shape, one or two colors and blend mode changes. Yet the variations seem unlimited:
Written exclusively for Webdesigner Depot by Ben Gremillion. Ben is a freelance web designer who solves communication problems with better design.
All of these examples use circles. Just imagine what you could do with triangles or trapezoids. Why not give it a go and link to your creations in the comments section below?
WDD Staff


Read Next

20 Best New Websites, April 2024

Exciting New Tools for Designers, April 2024

14 Top UX Tools for Designers in 2024

What Negative Effects Does a Bad Website Design Have On My Business?

10+ Best Resources & Tools for Web Designers (2024 update)

3 Essential Design Trends, April 2024

How to Plan Your First Successful Website

15 Best New Fonts, March 2024

LimeWire Developer APIs Herald a New Era of AI Integration

20 Best New Websites, March 2024

Exciting New Tools for Designers, March 2024
