• 14 May


    In this tutorial we’ll create a realistic 3D text scene using Photoshop with a little help from Illustrator for the 3D text.

    You need to have medium to advanced knowledge of Photoshop in order to complete this tutorial.

    To get started, go ahead and download all the images used from the Sxh.hu website. All images are free to download and here are the links: 1, 2, 3, 4

    Let’s get started and create a truly awesome 3D effect in just a few short steps. Try it out and feel free to post links to your own variations, we’d love to see what you come up with.


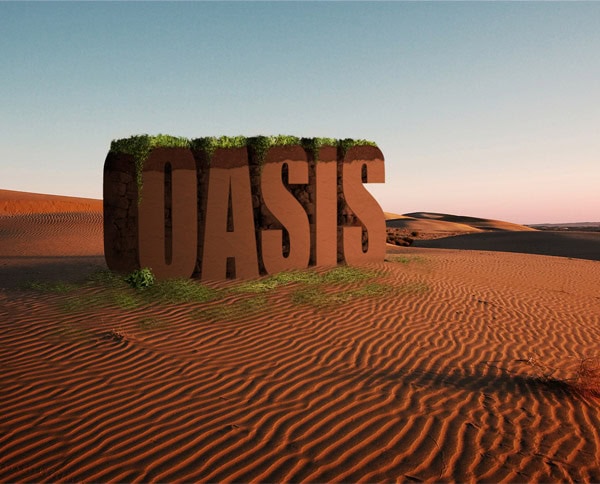
    Here’s a quick preview of the image that we will be creating:


    Step 1

    On a blank document type the text in Illustrator. I’m using the Impact typeface and this foreground color: #CCCCCC. Then go to Effect > 3D > Extrude & Bevel, and set the values as shown below. Then copy (Ctrl or Command + C) the 3D text.


    Step 2

    Let’s open Photoshop, create a new document (1280 x 1024 px) and put this image as a background. Then paste the 3D text (created on Step 1) as a Smart Object.

    Step 3

    Next, go to Filter > Render > Lighting Effects and set the values as shown below. This way the text will match the scene lightening.


    Step 4

    Select the Smart object layer, right click on the layer and select Duplicate Layer > Destination: New, and Name: Map. Then go to Layer > Rasterize > Smart object.  Save the document as Map.psd somewhere in your Desktop.


    Step 5

    Now, let’s save the previous document as “Displace texture”, delete the raster 3D text and paste this image on a new layer. This will be our first texture.

    Go To Filter > Distort > Displace, search for “map.psd” and set both the Horizontal and Vertical values to 50. Then, Select all (Ctrl + A or Command + A) and copy the selection.


    Step 6

    Paste the “Rock Texture” into a new layer above the 3D smart object. Change the Blending mode to Overlay.

    Ctrl (Command) + Click on Smart Object miniature to select the text shape, then Ctrl (Command) + Shift + I to invert the selection, then hit DEL to delete the extra texture (on the “Rock Texture” layer).

    Then use the Magic Wand tool to select the front face of the 3D text on the Smart Object layer and delete the selection on the “Rock Texture” layer.


    Step 7

    Using the Burn Tool, burn some shadows on the “Rock Texture” layer.


    Step 8

    Select the “Sand dunes” layer, select the Clone Stamp tool and holding the Option (Alt) key, click somewhere on the sand. Then create a new layer above “Rock texture”, name it “More Sand” and clone the sand on that layer.


    Step 9

    To improve the texture effect, delete some areas of  the “Rock Texture” layer.


    Step 10

    Now we’re going to add some ‘dirt’. Open the “Displace texture” file one more time. Paste this image into a new layer. Go To Filter > Distort > Displace, search for “map.psd” and set both the horizontal and vertical values to 50. Then, select all (Ctrl + A or Command + A) and copy the selection.


    Step 11

    Paste the “Dirt texture” into a new layer. Ctrl (Command) + Click on the “3D text” layer miniature to select the text shape, then Ctrl (Command) + Shift + I to invert the selection, then hit DEL to delete the extra texture (on the “Dirt texture” layer).

    Using a soft eraser, delete the bottom of the “Dirt texture” layer, then improve the result by using an irregular eraser.


    Step 12

    Change the “Dirt texture” blending mode to Multiply and add a small Drop Shadow.


    Step 13

    To add the grass, go to the “Displace texture” file and  paste this image. Apply a Displacement map, just like the other textures and finally copy the grass.


    Step 14

    Paste the grass on the main document, delete  the bottom part and using an irregular Eraser delete some areas on the borders.


    Step 15

    Burn some shadows on the “Grass texture” layer.


    Step 16

    Add a small drop shadow to  the “Grass texture” layer. Using the Sponge tool, desaturate some of the areas of the grass.


    Step 17

    Paste the grass texture into a new layer on a plane on Vanishing Point filter window (go to Filter > Vanishing Point) to match the perspective of the landscape.


    Step 18

    Erase some random areas of the “Grass” layer, and using an irregular brush delete some random areas here and there.


    Step 19

    Select a part of the grass, feather the selection and adjust the hue value to -30.


    Step 20

    Finally add a soft drop shadow to the “Grass” layer.


    Step 21

    Let’s add more details. Paste this image into a new layer and adjust the Hue/Saturation values to match the existing colors. You can call the new layer “Hanging plant” or something like that.


    Step 22

    Using an irregular eraser, delete everything with the exception of the hanging plant, and place them next to 3D text’s corners.


    Step 23

    Duplicate the “Hanging plant” layer and go to Edit > Transform > Flip Horizontal. Then distort the copy a little bit. Follow this with the use of the burn tool to make the copy darker according to the the scene lighting.


    Step 24

    Add as many details as you want. I added a few more hanging plants and a bush.


    Step 25

    Just to create a more dramatic effect apply these two adjustment layers to the entire design: a Photo Filter and a Gradient Map (Opacity 35%).

    Final result

    Now you’ve got a nice 3D text inside a photograph. Click on the image for a larger preview.  Try it on your own and come up with your own variations.


    Written exclusively for WDD by Alvaro Guzman.

    Have you tried the tutorial?  Feel free to post links to examples created using this tutorial…


    • Andreyco

      awesome tutorial, thanks a lot

    • http://www.marcofolio.net/ Marco

      Good to see some Photoshop Tuts here.

      The outcome looks pretty sweet, really like the “grass” stuff.

      Keep up the great work!

    • http://www.fuadbd.net Fuad Ahasan Chowdhury

      great sharing dude. :) cool.. though it has some extra process i think.

    • http://blog.insicdesigns.com insic

      wow! awesome composition. I havent tried a 3d effect in photoshop yet and now its the time. :)

    • http://randrambles.com Rand Duren

      Very cool.

    • patty

      excellent. not the normal weird unrealistic 3d tutorial. two thumbs up.

    • http://vectorss.com/ vectorss

      amazing tut. Thanks

    • http://eyoosuf.blogspot.com Yoosuf

      its a nice tut folks, keep it up

    • http://espresso-online.info jonathan wagener

      how cool is that!! :)

    • http://www.stpo.fr STPo

      I want my 3d transform in Photoshop, not in Illustrator! =’(

    • http://www.denisdesigns.com/blog Tyler

      Nice concept and a great outcome. Thanks!

    • http://tec-updates.blogspot.com Albin sebastian

      Grate work, thanks man …

    • http://www.glasshills.co.uk Jack

      Love the grass dotted over it! The only thing that is bothering me a little is the perspective looks slightly off – I think at the angle the text is set it should be a bit smaller towards the end as it just does not look like it sits right.

      Other than that it’s very cool. I have been wanting to do things like this for a while but never seem to find the right photos for it – or does that matter? Thanks for the tips.

    • http://www.logoblog.org/ Nora Reed

      That is interesting. Great job here. I think you can still add to this with some kind of running water, or lake that the words can be sitting in.

    • bebopdesigner

      Wicked! Thanks for sharing

    • http://www.leafydesigns.co.za Justin Leaf-Wright

      Sweet post man.
      Am going to try do my own one day when I have some spare time.

    • http://www.pidesign.com/clients/gpa2/index.php Sharene Lewis

      There are some nifty little tricks in this tutorial. Thanks for sharing.

    • break

      nice, thx

    • http://www.cavellblood.com cavellblood

      Very nice! I’d like to try it sometime. Looks very realistic!

    • http://www.southmakers.com Alvaro

      Wow! good to see my tutorial published here :D

      Glad you liked it, any question that you may have, just ask me…

    • Mario

      dude this is really cool:D

    • http://www.littleboxofideas.com/blog/ Sneh

      Wow! Awesome detailed tutorial .. love it! I tried something like this a few months ago, making an organic flora and fauna scene out of candy wrapped 3D text http://www.littleboxofideas.com/blog/freebies/museo-candy-3d-text-effect-a-typographic-wallpaper but never got around to writing a tutorial ..lol!

    • http://d2m.ca d2m.ca

      Wow.

      This is something nice to learn eh.

    • http://www.readingfortheblind.org KittyConCarnage

      I am totally lost on step 5.

    • http://www.readingfortheblind.org KittyConCarnage

      I should specify more. When exactly are we colorizing the text.

    • http://www.ercanaltug.blogspot.com Ercan Altuğ YILMAZ

      Very nice tutorial. Thanks..

    • http://www.southmakers.com Alvaro

      You’re right :D just add a light brown Color Overlay Effect > Blend Mode Overlay and rasterize the layer.

    • http://www.itsselvam.com Selvam

      awesome tutor :)

    • Mustafa

      Very Nice Good Job :)

    • http://www.kishan.info/ Kishan Bagaria

      Can you upload the PSD file of the tutorial? I will be very thankful if you do it.

      Thanks,
      Kishan Bagaria

    • http://www.crearedesign.co.uk Adam

      I gotta say I absolutely love this blog for tutorials like this. It’s so easy to get incredible text effects just by taking it one step at a time and this is a great job. The colours of the grass, sand and sky look terrific too. It actually looks very realistic!

    • http://samacreation.com sama creation

      wow! awesome th’x

    • Gryphon Graphics

      PLEASE HELP
      gr8 tutorial but in step 3, no matter how much I try to select ((Lighting Effects)) I simply cannot. I am able to select (Filter) and (Render) but ((Lighting Effects)) is not highlighted
      so I cannot select it. What am I doing wrong?

    • http://www.envolee-numerique.com MarieNum

      Great Work !
      Awesome effects, and I love the effect created by the grass added.
      Thx

    • http://www.RedesignYourBiz.com Design freak

      u’ve taught us a really good trick.

      thanks

    • http://10steps.sg Johnson Koh

      Interesting concept. Love it!

    • Chris

      Words fail me. Brilliant!! Some many awesome new tricks to try out. Thanks.

    • http://www.e11world.com e11world

      This was a really great tutorial. Thanks a million!

    • pranav

      superb job…. fantastic job. :)

    • http://www.promovernegocios.com Gustavo

      Me pareció una berraquera que se pueda hacer algo así. Realmente photoshop es una increíble herramienta para diseño grafico.

    • http://www.mayanohra.tk maya

      NICE :d

    • http://el-maxo.com el-maxo

      I agree with KittyConCarnage – Step 5 is wrong. When you apply the lighting effects as described it doesn’t blend into the browny way that is shown. It just stays grey with lighting effects on it. If anyone can get me past this step it would be good;)

    • Scan

      Having the same issue as Gryphon #32,
      Does anyone know the reason that Lighting Effects is greyed out? Or have a theory?

    • http://www.soliciteagora.com.br Northon

      Great tut, thks!!!!

    • Nani

      I agree with KittyConCarnage, el-maxo, Scan, Gryphon, etc.
      Step #5 is wrong… my 3D text doesn’t blend into brown neither

    • http://www.37u.net indir

      I “Step 5″ i did not apply. Can you explain how to do?

    • http://www.spotlightmedia.in/ web design chennai

      Thanks for posting and giving the tutorials about Creating a 3D Text Scene with photoshop,

    • Artur

      Perfect!.

    • NezAm

      Thanks ,…. Awesome its cool

    • http://www.nomiinfotech.com/ Web development lucknow

      Thanks for this tutorial.

    • http://www.honeytechblog.com Honey Singh

      Awesome tutorial !
      Thanks for the tips !

    • elyass

      good i should study it…

    • AjnabiZ

      Hello

      Nice tutorial but at Step 5, after applying the Lighting effects, the Text does not BLEND with the scene.

      @For those who are having problem with “Lighting Effects” not being enabled in the Menu, its because Image Mode is set to CMYK, change it to RBG for the Document.

      Then all the options under the Filter Menu will be enabled.

      But still, the Step 5 does not merge with the scene , there is a step missing.

    • AjnabiZ

      @For those who are having problem with “Lighting Effects” not being enabled in the Menu, its because Image Mode is set to CMYK, change it to RBG for the Document.

    • AjnabiZ

      Hello

      Regarding the step 3, if you watch the screenshot, the author has applied “Color Overlay” and “Pattern Overlay”. He used the same texture of rocks and made it into a pattern and applied it over the 3d Text.

    • Mark

      What’s the deal with the missing steps? You forgot to show your color overlay and pattern overlay steps.

    • http://babymax.net Sikiş İzle

      thanks for it. i can do this and i like it =)

    • http://sadeghgraphic.tk sourena

      hi

      very nice…

      Thanks for the tips !

    • http://www.philippineglobaloutsourcing.com Philippine Global Outsourcing

      Thanks for the detailed tutorial. And wow, that’s a long thread up there! This has really been helpful and inspiring especially for those who want to create something cool but just don’t know how to start. ;-)

    • http://www.game4barbie.com http://www.game4barbie.com/

      Very good,nice…

    • http://ggrblog.com Go Green Tips

      Just one word – WOW! Where do you people get such creative ideas from? I am about to create a poster for my blog on “Go Green Resources” and found this tutorial. A Big thanks!

    • http://presretac.com presretac

      nice effect

    • http://www.clippingimages.com clippingimages

      WoW :) Awesome tutorial post. Some excellent design methods used in this tutorial. Thanks for sharing this nice post.

    • Haytham

      thax alot it really helped me on my studies

    • http://hanza.com.br Paulo Victor

      Bealtfull efects, thanks!

    • aries

      wooo … what a nice tut ;
      great

    • http://www.designtorontoweb.ca/ Web Designer Canada

      Never tried illustrator before. Thanks for the easy to follow steps…

    • http://www.filmizledik.net film izle

      woowww perfect :|

    • balon turu

      Bealtfull efects

    • http://www.shantee.net shantee

      wow that’s amazing, i am making a brochure for a festival , i had that vision , of something like desert + grass, and i found that tutorial, thats just what i needed..beautifull indeed !

    • http://howtodate101.com how to date 101

      Amazing tutorial and on the correct time! I may come back again to read more of your tutorials :)

    • GREATLIBERO

      Pic 4 doesn’t exist anymore :(

    • http://none Deelux

      Hey all!

      I must say I really like the outcome of the tutorial but I don’t like the fact that there is a step missing. Like a few other people I can’t seem to get the color overlay right after adding the lightning… It stays grey and I can’t figure out how to get it right….
      Please can someone who managed to get it right post how you should do it?

      Thnk in advance!

      And thnk for the great tutorial

      Deelux

    • http://nustaffsite.gunadarma.ac.id/blog/hanum hanum

      wow.. really nice. Thank’s for info sharing ;)

    • http://www.eauparfum.net parfums

      I do not have words… I need to thank you for this wonderful post. Reason – I had been trying out to make my logo and its text in 3D using photoshop and was just unable to figure out how to go about it. I have tried it following your detailed tutorial and this has helped me in getting an idea on how to go about it.
      This tutoial is best for those who have very little knowledge of Photoshop but their profession needs them to have a knowledge of almost everything on this planet.

      Thanks Again :)

    • http://ramalhowebblog.blogspot.com Ramalho

      Hi WEB Family,

      Excellent tutorial and it´s good to see it.

      Thanks for sharing

    • http://www.visualizermagazine.com/ Görsel

      WoW! Awesome tutorial post.

    • http://www.clippingimages.com clipping path

      Really Great Work… I love it… The gras work is awesome… :)

    • http://kinogen.ru James

      Very good method… with photoshop!

    • http://thehcsindia.com Dowel Pins

      I just bought Adobe Photoshop CS4 and going to try this out. I will post back how it turned out for me. Thanks for the tutorial!

    • http://www.googletopranking.de Google Top Ranking

      ah, rendering is something I really do like but I still couldnt learn it. well, if there is something you can plug into your brain so that you can simply download knowledge please mail me :)

    • http://magnetfeldtherapiegeraete.betterfind.org/ magnetfeldtherapiegeräte

      I think that it really looks nice but I am still too lazy as it requires too much work. or is it me who is too slow with working on design?

    • http://mahmudurrahmanblog.blogspot.com Mahmudur Rahman

      Nice tutorial. Very creative one and well explained. Thanks for share. :)

    • TNbuttman

      Great tutorial! It’s easy to follow and duplicate, not like so many with missing resources and/or steps.

    • http://www.beachbar-gaia.gr ndimos

      Regarding (missing) step #5, here’s what you have to do:

      When in the first step of Illustrator, write your text NOT with colour #CCCCCC, but with colour of #9A552C. Then, paste it in your photoshop document already coloured and continue your work…

    • http://no nilesh

      very nice tutorial…………

    • http://kurtlar-vadisi-pusu-son-bolum-izlet.blogspot.com Kurtlar Vadisi Pusu Son Bolum izle

      Thanks for this artical ı liked it

    • http://www.domometer.com Domometer

      Now that’s really cool! I liked the rock-in-the-shadow effect.

    • Vince

      The desert scenery coupled with the text looks amazing. It somehow looked very realistic. It actually inspired me for my logo design and I got my designer from logodesignplanet.com to design a logo incorporating elements found from your tut. It came out better than expected as I thought it would be difficult to look strong and corporate but it looked really polished. Even my friends who were skeptics at first were blown away by how the logo design turned out. I got to thank you for posting this tut as I did show to my designer for reference to how I want it to look like. Thanks heaps!

    • Michael

      after i ctr+c my 3d text from illustrator and ctr+v into photoshop as a smart object, it will only let me render clouds and difference clouds. no lighting effects available whats wrong?

    • Michael

      even after applying gradient and color overlay i still cannot add lighting effects? hmmm whats still wrong?

    • http://commingsoon Avdhesh

      nice tut. I did already something like it but here growing grass it’s very nice.

    • http://www.logoinn.com Ben johnson

      Good tutorial. I have bookmarked you.

    • http://mutiarar06.student.ipb.ac.id mutti

      Your tutorial is very great! very detail and clear so that I could follow it. thank you so very much…

    • http://penisenhancement.delstrange.com/ Ken Enlarge

      Your tutorial is very great! very detail and clear so that I could follow it. thank you so very much…

    • http://chairila06.student.ipb.ac.id chai

      cool tutorial, i bookmark first, maybe some day i can try this.. thanks

    • http://www.iyioyunlar.org oyun oyna

      WoW! Awesome tutorial post.

    • http://bambang.wijonarko08.student.ipb.ac.id wij

      hmm,, that’s amazing design…
      what a cool effect !!
      thanks for tutorial..

    • http://oki.maulana08.student.ipb.ac.id oky

      i tried it in my PC, but i still can make it…
      but it’z awesome

    • http://rifkiaansyah08.student.ipb.ac.idq rifky

      awesome..thanx…i’ll try it!!!nice…

    • http://free71.com free71

      Thanks and great tutorial!

    • http://nofel.saputra08.ipb.ac.id nofel

      hmm nice tutor, thx

    • http://yangyangli.info/ Yang Yang

      I think I’m the first person to mention this,
      To do this tutorial, you have to buy both illustrator and photoshop.
      Thank goodness I have both :-)
      This is the prettiest Photoshop picture I have ever seen. Great job

    • http://www.gncmaster.com script indir

      WoW! Awesome tutorial post.

    • Nancy

      it was really great…..keep up the good work high…..and we promise to continue photoshopping :-)

    • http://www.axigenc.org/ Yabancı dizi indir

      Great tut, thks!!!!

    • http://www.hayata-dair.com hayata dair

      WoW! Awesome tutorial post.

    • http://www.archivetr.net/ hotfile download

      nice photoshop.thank you.

    • http://www.danielsjewelers.com/MothersRing.aspx mothers rings

      Its weird how things are created. It takes so much time I bet to create a real movie!!!

    • http://mag1cwind0w.deviantart.com/ Mag1cWind0w

      Really interesting and useful tutorial, with a very good explanation for all the steps, understandable by everyone, from expert to newbie with Photoshop.
      Thank you so much for this great tutorial! : )

    • http://www.laurencecaro.co.uk/ Web Design Banbury

      This is awesome! Will be trying something like this later today. Thanks for posting. LC

    • http://www.claucebrianphotography.com/ lifestyle photography in Miami

      Your tutorial style is very helpful for any beginner & other also.

    • Muhammad Inayat Hussainkhan

      its a really veryh nice and someting is look attractively
      thank

    • Howard

      very nice
      i would add cracks to the front of the text so it would mook more like it was cut out and old since theres grass growing on it already

    • http://www.thegetpr.net seoservice

      useful information here.

    • http://www.macromindz.com Khan

      Must say that everytime i see a tutorial on this site it gives me inspiration . A great tut easy to follow and learn .

      Keep it up 5 stars

    • http://njhlove.tistory.com CreativeJH

      Great Tutorial ! Thanks to your creative inspiration. :D
      Unfortunately, I could not get one kind of source(field Texture Image).

    • Kristi

      is this for CS5? Cause I can’t find the Effects menu in CS4

    • http://www.thetutorialandreview.com TTAR

      really nice tutorial.. Also liking your layout.. stands out from the crowd..!

    • Sergio

      What photoshop version is this?

    blog comments powered by Disqus

Home| Advertising| About| Contact

© 2012 All Rights Reserved