 A photograph of a stunning model is sitting before you that has serious potential but several flaws.
The shade of the female model's hair is dull, her eye color just isn't doing it for you, and she has several pimples across her otherwise flawless face.
What do you do? Touch up the photo using Photoshop, of course!
The number of options available for enhancement are now sky high, but what's the best way to clean the photo up?
To simplify the retouching process, we have highlighted the best and worst ways to create a clean, professional-looking photo in Photoshop.
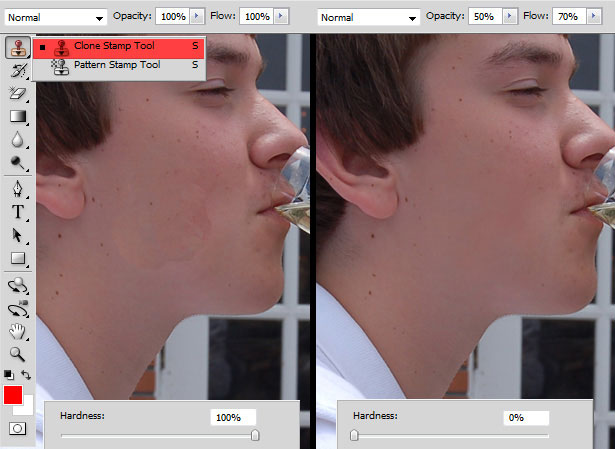
DON'T Rely Solely on Clone Stamp Tool for Your Dirty Work
The Clone Stamp tool is commonly used to retouch photos, but overusing it can yield horrific results.
Using a high opacity and hardness can give target areas a lumpy feel, especially if the region you're sampling isn't a close enough match in color. Opt for a lower opacity and softer brush in most cases.
If you can't avoid using the Clone Stamp tool or are just plain attached to it, don't turn your back on other tools that could smooth out the kinks. A quick swipe of the Blur tool can make a world of difference.
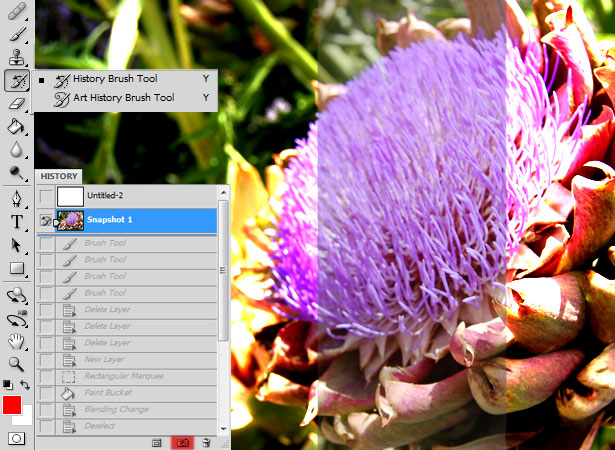
DO Use the History Brush.
Over-blurring a subject is a common mistake. To fix it, use the history brush. It never hurts to take incremental snapshots in the history palette as you work. Doing so saves time and a lot of 'undo's'.
The history brush goes hand in hand with the history palette. You need to set the source of the history brush to know where it will sample from.
You can do this by clicking the open box next to a layer in the history palette. This is why it's best to take snapshots using the icon outlined in red; this way, you know exactly what your image will look like before you apply the history brush.
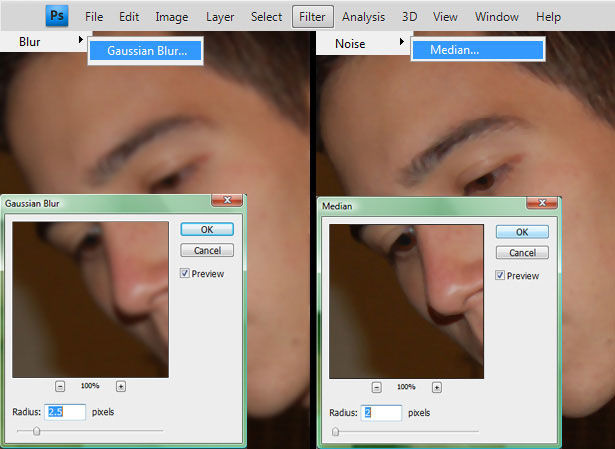
DON'T Expect Gaussian Blur to Do All the Work, or Even a Clean Job
Gaussian Blur is overrated. Not only does it blur background colors with the subject, but it gives a mannequin-like feel if used incorrectly. Median is a happy medium for the blur filter technique. It keeps colors clean and intact. Never tried it? By all means, do (Noise → Median).
Blur is generally used to clean up blemished skin, not for clone stamping or healing. In general, put the picture through a blur filter, keeping a copy of the original directly above in the layers palette, and erase the features (such as eyes and hair) on the duplicate layer that you want to keep sharp.
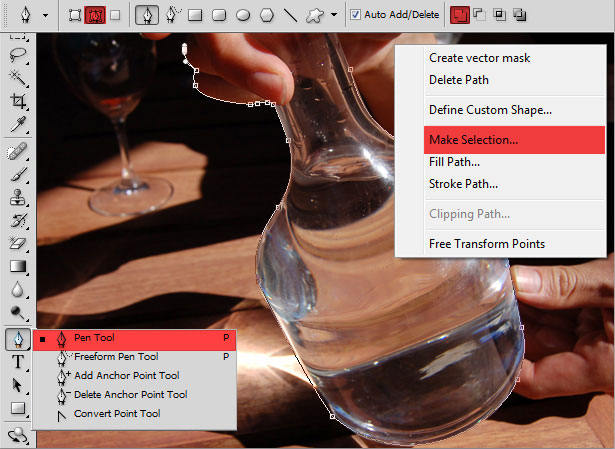
DO Give the Pen Tool Some Love
The pen tool is as precise as you can get. When it comes to selecting a small area, such as teeth or eyes, it is by far your best bet.
Heck, any odd-shaped area would fall under the reign of the pen tool. Simply outline the object, go to the Path tab, right-click on the work path and then choose "Make Selection."
You could also press the "Load path as selection" button while the working path layer is active under the Path tab.
DO Experiment With Other Tools You Wouldn't Normally Use
This tip may sound absurd when you're racing to get a project done, but finding a newer, faster way to perform a task will help in the long run.
For example, I recently discovered the wonders of the Extract filter, and ever since I have used it every chance I get. It's especially great for hair, because you can quickly outline the area with the marker and fill it in.
Refining edges afterwards takes no time at all. With a swipe of the history brush, you're good to go. Note: Extract is not available in CS4, although you can copy it from the CS3 plug-ins/filters folder to the CS4 directory.
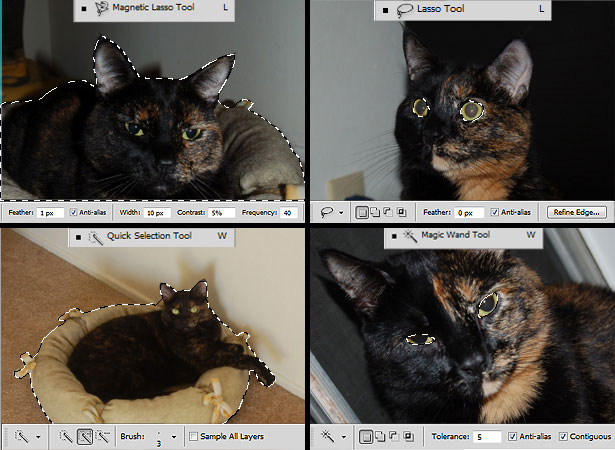
DON'T Neglect the Many Selection Tools at Your Disposal
Although the pen tool does wonders, tracing around a subject can be slow. Use your judgment when choosing a tool for each selection.
The Elliptical Marquee tool is great for beginners. The Quick Selection tool set at a low size is great for large elements such as lips, hair and clothes.
Hitting the "Refine edge" button always helps if you need something extra.
The Magnetic Lasso tool is especially good for outlining, and its slower cousin the Lasso tool is excellent if you have a steady hand.
Lastly, the Magic Wand tool set at a low tolerance is great for clothes, especially when paired with the Quick Selection tool. Overall, the sheer number of selection tools available opens many avenues to you. The lesson is, don't limit yourself to a small... er, selection of tools.
- When using a selection tool, hold "Alt" to subtract from the selection or "Shift" to add to it.
- Hold Shift to create a perfect circle with the Elliptical Marquee tool. You can also hold Shift + Alt to expand from the center of your mouse.
- Selecting the object you're trying to isolate rather than the background is often easier when you want to remove it. Simply select the object cleanly and press Alt + Shift + I to invert the selection.
- When switching between selection tools, make sure to hold Shift before continuing your selection. Let's say you have selected half of your goal with the Magic Wand tool. Then you decide to switch to the Quick Selection tool to finish it up. To add to what you've selected previously, hold Shift before selecting the rest of the area, or else you'll start a new selection.
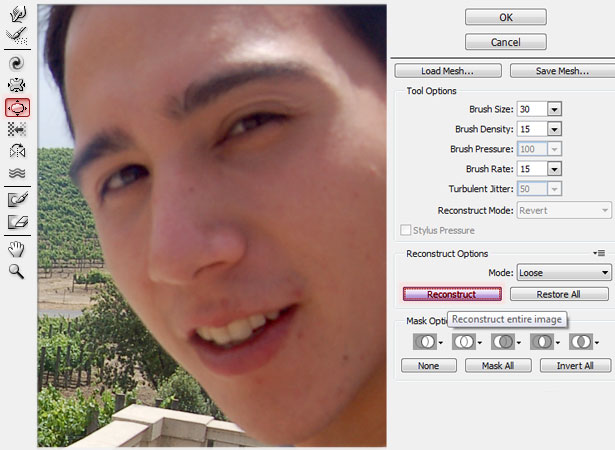
DO Let the Liquify Filter Work Its Magic.
If used properly, the Liquify Filter (Ctrl + Shift + X) can replace many tools. For instance, the Forward Warp tool, which is included in the filter, is much more accurate than the Smudge tool, and the Twirl Clockwise tool replaces the Twirl filter, which is found in Distort. These are just a few of many examples.
Not only could the Liquify Filter be your one-stop shop for distortion, it also allows you to freeze areas that you don't want to be affected.
The best part about this filter is that if you go a little crazy bloating an area, you can always fall back on the Reconstruct button to correct it.
Note: be sure to make the grid visible before editing to get a better sense of how the tool is affecting the area.
Bloat (shortcut "B") is a great way to enhance features. Using a low brush rate and density is your best bet for making changes that aren't too extreme. Reconstruct is your best friend in this case. It normalizes changes in one click.
What's the best part about Liquify? It can restore all without you having to exit the filter.
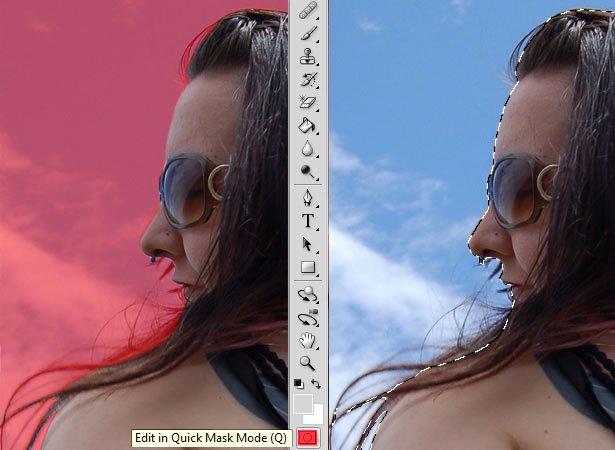
DON'T Overlook Quick Masks.
CS4 doesn't have the Extract filter, unless you took my advice and copied the filter from an older version. So, what do you do when you're in a rush to make a selection? Quick Mask, of course.
Simply press "Q" to activate the tool, brushing around the subject you want selected, and press "Q" again to make all unpainted areas become your new selection. Pretty nifty, huh?
Note: Don't forget to revert your colors to the default by pressing "D," so that black is your base color, before Quick Masking to your heart's content.
Quick Masks are a fast way to isolate an area. Make sure to zoom in far enough (Ctrl +) to get the perfect outline when brushing around a subject. If you make an error, switch your brush color to white (using the "X" hot key if colors are default) to get rid of red where it shouldn't be.
DO Heal Away the Pain
As mentioned, the Clone Stamp tool can be rough for matching colors. That's where the Healing brush comes in. The idea is similar to the Clone Stamp tool (i.e. sample an area and brush away the blemishes), but it is far more intelligent.
The Clone Stamp is a kind of copy and paste, while the Healing brush blends the new area with the sampled area and takes into account tonal qualities.
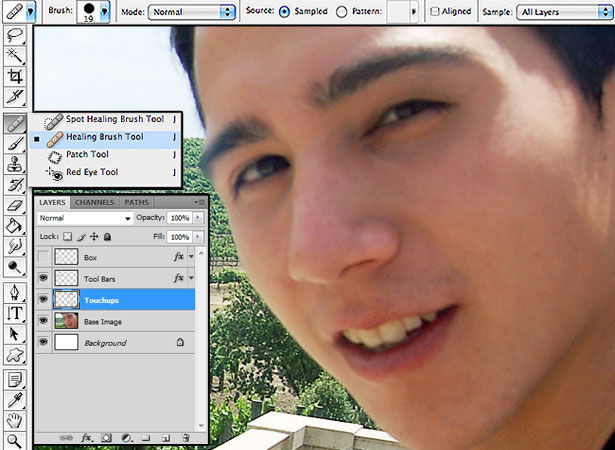
The first thing to do upon opening the Healing brush is to change the sample drop-down to all layers. This is probably one of the most important steps because any changes you make won't affect your original image (as long as you have created a new layer for your retouches).
Adjust the hardness to something a bit softer than the standard 100% for a cleaner heal with no visible edges. Don't forget to adjust the diameter of the area you'll be adjusting, using the [ and ] keys to grow and shrink the brush.
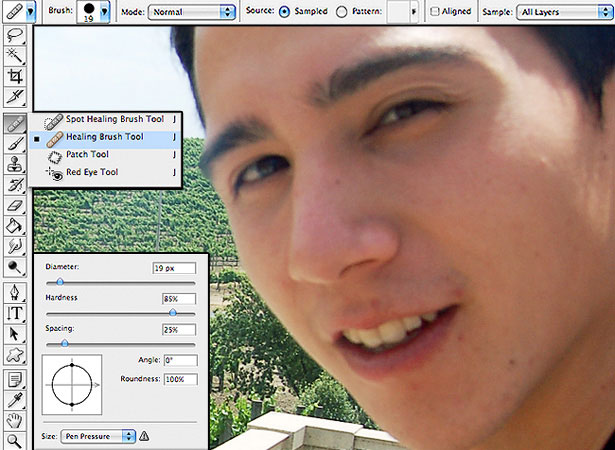
The skin here is fairly high contrast, so I was especially careful to sample the right spot. Best practice is to sample the area closest to where you will be covering up. I touched up the crow's feet and blemishes around the mouth in a new layer; so the base image is intact in case I make an error.
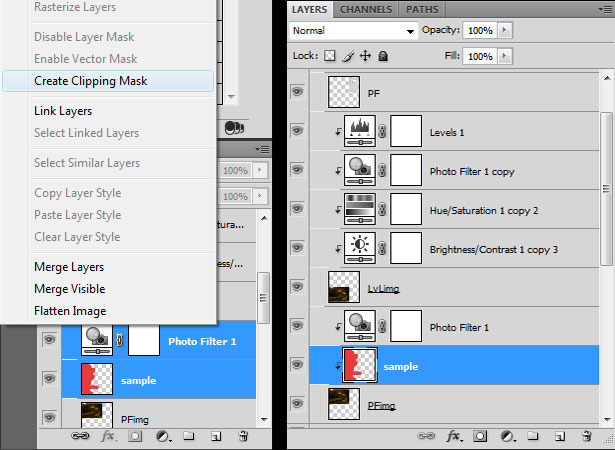
DON'T Be Bashful With Creating Clipping Masks
Clipping Masks make your life a whole lot easier.
Here is a good example. Say you have four layers comprised of photos and an adjustment layer above them all. You want the adjustment layer to affect only one of the four photos.
Position the photo that you want affected under the Clipping Mask. Then all you have to do is right-click your adjustment layer, and select "Create Clipping Mask."
Now, the adjustment layer will affect only the photo below. This simple technique saves a lot of re-arranging; and if at any time you want to remove it, just right-click the Clipping Mask layer and select "Release Clipping Mask." Life was never so simple.
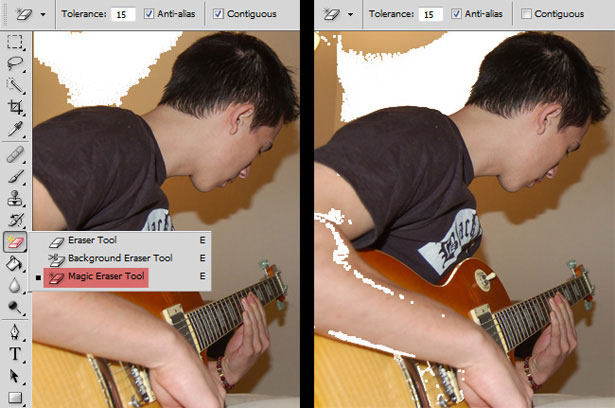
DO Eliminate Backgrounds With the Magic Eraser Tool
We've gone over several ways to select objects for removal or enhancement via the selection tools, but one tool remains: the Magic Eraser tool.
This tool shouldn't always be your first choice, but it can come in handy. Its best use is for when you have a perfect photo except for the worst background imaginable (like a messy bedroom or bathroom).
The first thing to do is lower that pesky tolerance to something more bearable. I usually start with 15.
If Contiguous is selected in the toolbox, the Magic Eraser will get rid of neighboring pixels of the same color.
If Contiguous isn't selected, it will remove the selected color from the entire photo. Using the Magic Eraser tool to remove all of the background isn't wise, but it does give you a quick starting point for removing backgrounds.
Note: Press Shift + E to quickly cycle through the eraser tools. This also works with all tools that have stacked options. For example, Shift + G toggles between the Gradient and Paint Bucket tools.
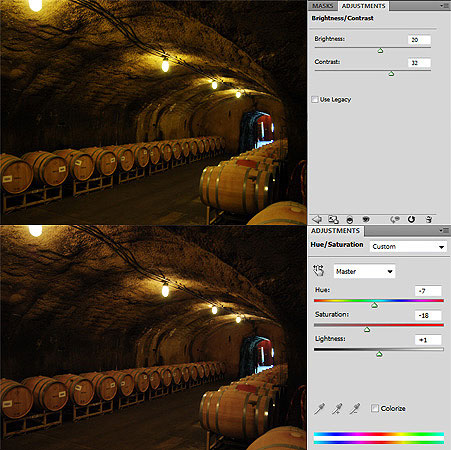
DON'T Stop at Brightness and Contrast to Color Correct
Brightness and contrast can work wonders for color, but don't stop there. Merely adding a selective color adjustment layer can do wonders for tones that are too warm or cool.
Select the color you want to adjust and use the slide bars to tweak it just so. You can choose from plenty of other adjustments, so have some fun with this one.
In this first example, I slightly upped the brightness because the photo's lighting is poor. I also shifted the hue away from yellow and dropped the saturation. With these two adjustments alone, the photo already looks cleaner.
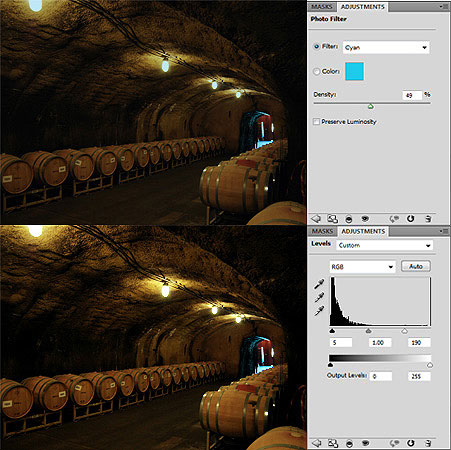
Using only the hue and saturation adjustment, I couldn't completely remove the overbearing yellow tone. By using a photo filter with a cool tone, we can steer the lighting in a more natural direction. Lastly, tweaking the levels helps remove grays and add contrast.
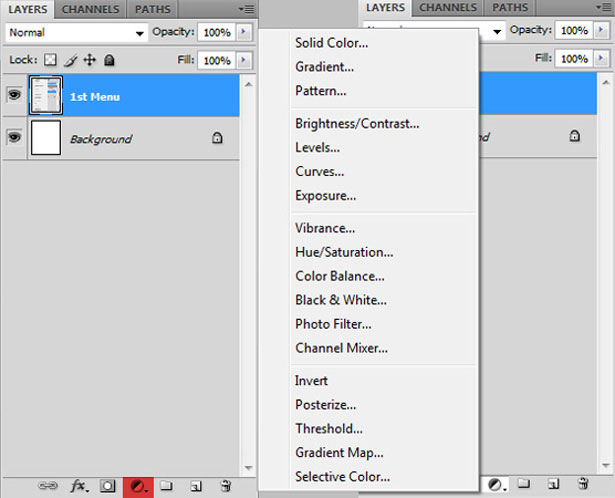
DO Choose an Adjustment Layer Over an Adjustment
The reason for this is simple. If you decide that you don't like an adjustment that you have made, you can just delete the layer.
This practice saves you from many Ctrl + Z's and possibly losing a serious amount of work. Note: the adjustments I'm referring to are the options marked in Image → Adjustments.
A Few Quick Tips
- When working with a lot of layers, lock them.
- Always save in iterations.
- Use the history panel to navigate to previous or later states, rather than go crazy with Ctrl+Z.
- Clone in different layers to keep from damaging the original photo. It is as simple as checking "Use all layers" in the tool bar, with the clone stamp tool selected.
- Do most of your editing in RGB mode. It is far more editable than CMYK.
- Mind your DPIs. If you're working with print, 300 DPI is standard. For concepts, 72 DPI is acceptable.
- Make a habit of naming your layers. Scrolling through 20 unnamed layers can get confusing.
- Ctrl + left-click a layer thumbnail to select everything in that layer.
- Use the Dust and Scratches filter (found under Noise) to get rid of unwanted artifacts.
- Feathering a selection never hurt anyone, and it sure won't hurt for most selections either.
- Set your undos high by going into Edit → Preferences → Performance. You'll see a history and cache area, where you can set your history states to a maximum of 1000. This comes in handy for larger projects, but beware: it eats up more memory.
Written exclusively for WDD by Heather Bartron.
Do you have any DO's or DON'Ts to add? Leave a comment below and help us expand our minds.
WDD Staff


Read Next

3 Essential Design Trends, May 2024

How to Write World-Beating Web Content

20 Best New Websites, April 2024

Exciting New Tools for Designers, April 2024

How Web Designers Can Stay Relevant in the Age of AI

14 Top UX Tools for Designers in 2024

What Negative Effects Does a Bad Website Design Have On My Business?

10+ Best Resources & Tools for Web Designers (2024 update)

3 Essential Design Trends, April 2024

How to Plan Your First Successful Website

15 Best New Fonts, March 2024
