 On screen, the colors of pixels are a mix of red, green and blue values. A fourth value, opacity, controls how pixels blend with pixels laid over them.
In image-editing programs such as Photoshop, changing the opacity of a layer is easy but not always precise.
Setting a layer to 50% opacity makes all of its pixels half-visible. If the situation calls for variable visibility, then layer masks are the answer.
A layer mask can give individual pixels different opacities. A layer mask is like a light cast onto a layer.
When the light is on, or white, the image is visible. When the light is off, or black, the layer can’t be seen.

Applying a layer mask to a photo hides certain parts. Photoshop uses a grid to represent “nothing” (i.e. completely transparent regions). Unlike areas modified by the eraser tool, areas hidden with layer masks can be restored even after the file is closed.
Shades of Gray Mean Variable Opacity
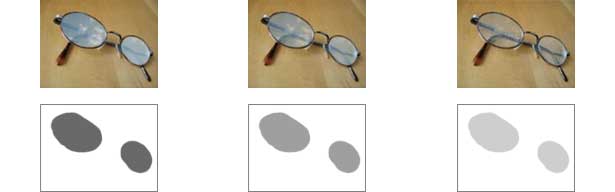
Opacity isn’t always on or off. Using shades of gray allows pixels to be partially opaque. The lighter an area of the mask, the more opaque it will be. For example, an 80%-white mask will be 80% visible, while a 20%-white mask will be 20% visible.
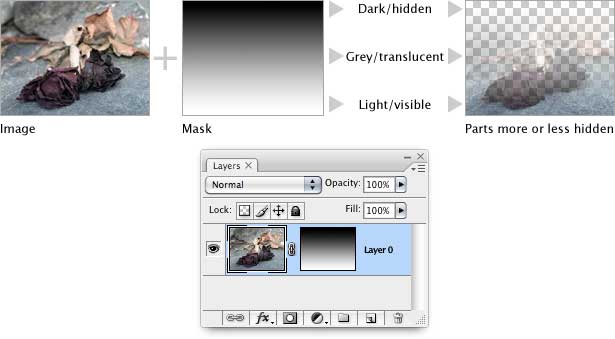
A mask with a dark-to-light gradient hides the top and shows some of the center and most of the bottom. Gray areas in the mask reveal or hide the pixels but don’t change the layer’s pixels.
Straightforward Examples
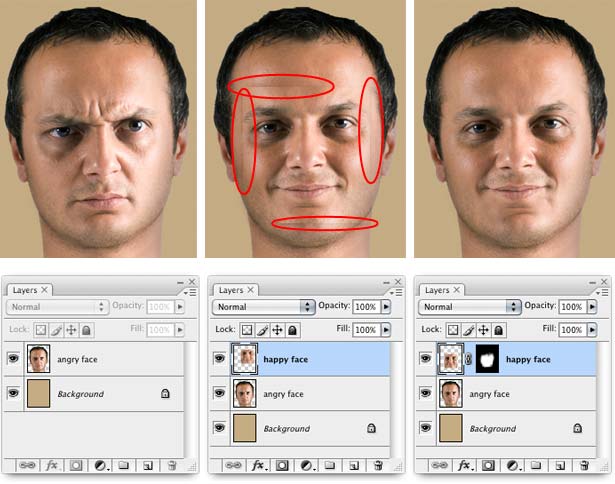
The image above shows how layer masks can be used to change a face.
- The original image sets a cut-out head on a beige background.
- Laying a happier face on top of the head doesn’t work; the lighting is slightly off.
- A soft-edged brush on the mask blends the face and head together.
Again, one major advantage here is the ability to correct mistakes. Layer masks can be edited as often as needed. This benefit is more evident in the process than in the result.
The edges of a layer are no different than the center, in terms of editing.
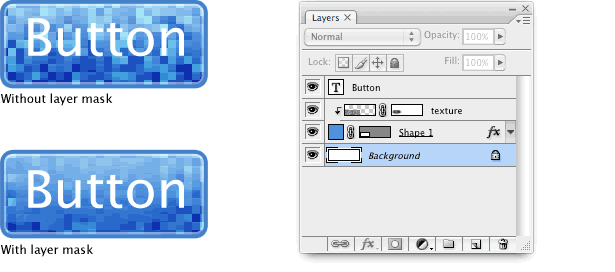
A grid-like texture is interesting, but it makes text hard to read. By darkening a mask on the texture layer, the text becomes legible; the texture loses strength and improves the text’s readability.
A Range of Transitions
Layer masks lend themselves to two types of transitions: hard edges and gradual blends. Gradual blends create a fade over a certain area and are easy to apply with the gradient tool. Hard-edged transitions work best with the natural “seams” in an image.
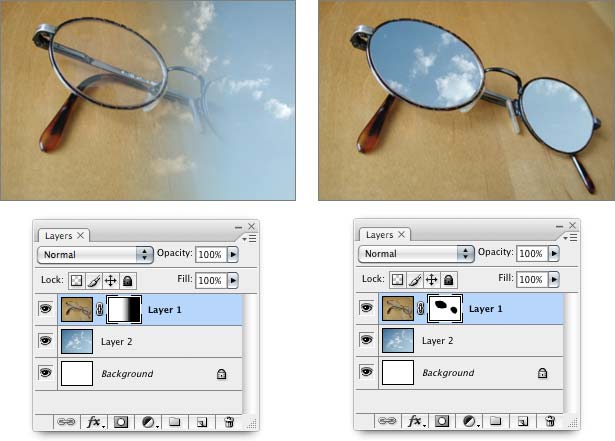
Above, two images are combined with a gradual blend and natural seams. Where there is pronounced contrast in an image, this is a seam; seams include the edges of objects, the sides of letters and numbers and abrupt changes in the depth of field. Natural seams are usually the most visually satisfying places to combine images, but detecting them takes some practice.
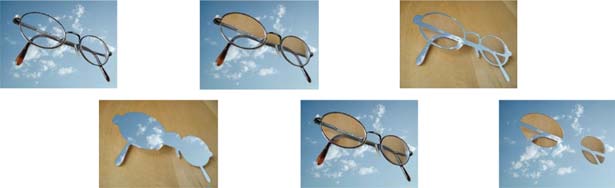
With some imagination, we can use the natural seams in the eyeglasses frames in the image above to show the sky image in different ways. Is the sky behind the glasses, inside the lenses, between the frames or somewhere else? The answer depends on the artist’s creativity.
The effect doesn’t have to be all or nothing. By painting with shades of gray (or using Image → Adjustments → Curves or Image → Adjustments → Levels), the glasses can appear to reflect clouds, rather than become portals to the sky. Sometimes this requires more precise control—or a better view of what the mask looks like.
How to See What's Going On
To see the mask as a grayscale image, Option-click (Mac) or Alt-click (Windows) its icon in the Layers palette. Click the layer icon to return to the “normal” view. One advantage of Option- or Alt-clicking the mask is that it gives you the ability to paste.
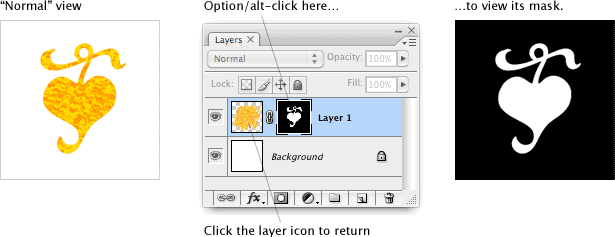
Switching between the layer and its mask is a simple click, and the reasons to do so are two-fold. First, it shows exactly what’s going on and sometimes reveals mistakes. Secondly, it enables users to paste bitmaps into the mask.
Any image that can be copied—a layer, part of a photo or an illustration—can be pasted into the mask. The mask above was created by copying a solid shape, Option/Alt-clicking the mask icon and pasting. From here, the mask can be edited with any painting tool.
Editing the Mask, Not the Layer
Viewing the layer isn’t necessary, but it’s easy to forget which mode Photoshop is in. The key is a set of brackets around the appropriate icon.
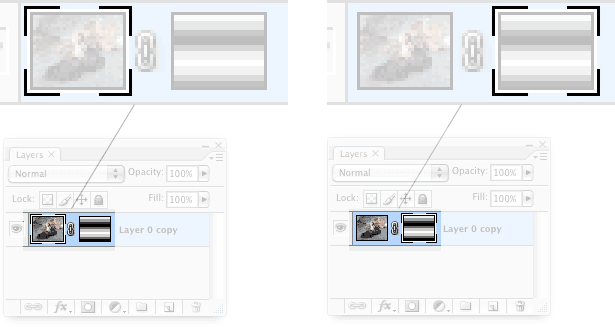
A layer with a mask has two icons in the layers palette. When brackets surround the left icon, Photoshop is editing the layer’s pixels. When brackets surround the right icon, Photoshop is editing the layer’s mask. The difference is subtle but important. When painting a mask, be sure to click on the mask first.
Shortcuts
When editing a mask, a few keyboard shortcuts will come in handy. Type the letter “D” (Mac or Windows) to set the working colors to their defaults (black and white). Typing “X” switches the background and foreground colors. This toggles between reducing opacity (black) and restoring it (white).
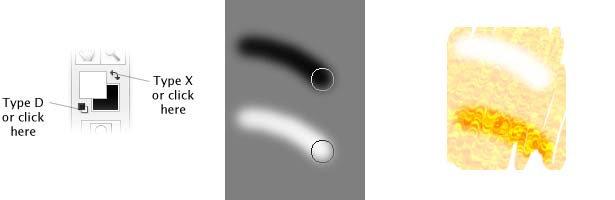
The keyboard shortcut “X” makes switching between the two very easy, and the layer masks make removing and restoring opacity useful.
Conclusion
Layer masks are a flexible tool for creating complex illustrations, buttons, graphics, icons and logos. Any image that combines elements would benefit from layers, and designers would benefit from the ability to edit as they go.
Written exclusively for Webdesigner Depot by Ben Gremillion. Ben is a freelance writer and designer who solves communication problems with better design.
What techniques do you use to control opacity in a Photoshop layer? Share your ideas in the comments below.
WDD Staff


Read Next

15 Best New Fonts, July 2024

20 Best New Websites, July 2024

Top 7 WordPress Plugins for 2024: Enhance Your Site's Performance

Exciting New Tools for Designers, July 2024

3 Essential Design Trends, July 2024

15 Best New Fonts, June 2024

20 Best New Websites, June 2024

Exciting New Tools for Designers, June 2024

3 Essential Design Trends, June 2024

15 Best New Fonts, May 2024

How to Reduce The Carbon Footprint of Your Website
