
 Today I'm going to talk to you about setting up a local server to use with WordPress. Using a local server is important for many reasons, if only to keep you from having to upload and download your files all the time. Anytime we need to make changes, we can use the local server.
To keep your website live without putting it in maintenance mode for a very long time, we can use the local server.
Downtime is an enormous fear of many website owners and this alone keeps them from making big changes or upgrades, because after all, downtime can cause your website to miss out on sales, affiliate income, new visitors or it may even cause some search engines to drop a few pages from their indexes. With a local or testing server, this no longer has to be a concern.
So now that we know a few good reasons to set up a local server, let's go ahead and find out how we can do this.
Today I'm going to talk to you about setting up a local server to use with WordPress. Using a local server is important for many reasons, if only to keep you from having to upload and download your files all the time. Anytime we need to make changes, we can use the local server.
To keep your website live without putting it in maintenance mode for a very long time, we can use the local server.
Downtime is an enormous fear of many website owners and this alone keeps them from making big changes or upgrades, because after all, downtime can cause your website to miss out on sales, affiliate income, new visitors or it may even cause some search engines to drop a few pages from their indexes. With a local or testing server, this no longer has to be a concern.
So now that we know a few good reasons to set up a local server, let's go ahead and find out how we can do this.
Step one
The first step is to find out which software you want to use. Two of the most popular are XAMPP and WAMPSERVER. With XAMPP (Cross-Platform Apache MySQL PHP Perl) you get a software that is compatible with all platforms, including Linux, Windows, Mac OS X, and Solaris. After testing the software however, I would say it has a bigger learning curve than WAMPSERVER.
WAMPSERVERis only compatible with Windows but is a much more user-friendly software. Since Windows can be added to a Mac partition, there's no reason not to go with WAMPSERVER.
For this tutorial we're going to use WAMPSERVER. The many benefits of WAMPSERVER are apparent once you start using the software, but let's go over a few. WAMPSERVER uses Apache2, PHP and MySQL and gives you the ability to change settings for each of them.
With PHP you can change the version, change different settings such as “display errors” or "short open tags”, you can even turn on and off different PHP extensions such as “PHP_curl” and “PHP_tidy”. A few other things you can do with the PHP options is to read the error log or even set up a PHP.ini file.
Taking a look at the Apache options, you can change the version, stop/start the service and set up testing ports, enable/disable modules such as the “actions_module”, you can even add an alias directory like “http://localhost/yoursite” with the click of a button. A few other Apache options are to read the error and access logs as well as configure directly your httpd.conf file.
As we can quickly see WAMPSERVERhas many options to offer with those listed above including the ability to change many MySQL settings and use phpMyAdmin.
With XAMPP (Cross-Platform Apache MySQL PHP Perl) you get a software that is compatible with all platforms, including Linux, Windows, Mac OS X, and Solaris. After testing the software however, I would say it has a bigger learning curve than WAMPSERVER.
WAMPSERVERis only compatible with Windows but is a much more user-friendly software. Since Windows can be added to a Mac partition, there's no reason not to go with WAMPSERVER.
For this tutorial we're going to use WAMPSERVER. The many benefits of WAMPSERVER are apparent once you start using the software, but let's go over a few. WAMPSERVER uses Apache2, PHP and MySQL and gives you the ability to change settings for each of them.
With PHP you can change the version, change different settings such as “display errors” or "short open tags”, you can even turn on and off different PHP extensions such as “PHP_curl” and “PHP_tidy”. A few other things you can do with the PHP options is to read the error log or even set up a PHP.ini file.
Taking a look at the Apache options, you can change the version, stop/start the service and set up testing ports, enable/disable modules such as the “actions_module”, you can even add an alias directory like “http://localhost/yoursite” with the click of a button. A few other Apache options are to read the error and access logs as well as configure directly your httpd.conf file.
As we can quickly see WAMPSERVERhas many options to offer with those listed above including the ability to change many MySQL settings and use phpMyAdmin.
Step two
Your second step is going to be actually installing the software, so go to http://www.wampserver.com/en/ and click the WAMPSERVER download that applies to your system: 32 or 64 bits. Once you have downloaded and saved the file to your desktop or somewhere else, go ahead and double-click it to install.
When the window pops up click Next and accept the user agreement on the next window.
Once you have downloaded and saved the file to your desktop or somewhere else, go ahead and double-click it to install.
When the window pops up click Next and accept the user agreement on the next window.
 Then choose your directory which can even be on a removable storage device such as a flash drive. Click Next twice, then install.

Step three
Once you've installed Wampserver, it's time to get it set up. If you put a shortcut icon on your desktop, click on that and it will start the service, otherwise you will need to go to the Windows start menu > all programs > Wampserver. After starting WAMPSERVER you will notice a pink icon turned to a green icon, then you can simply go to local host in your address bar and you will be greeted with the WAMPSERVER homepage. Here you will have access to your PHPinfo, phpMyAdmin and your projects.

(Left PHPinfo) (Right phpMyAdmin) These two services should already be set up for you, so click on the green icon in your taskbar, go to Apache and click on httpd.conf because we need to set up a few things in here.
 Once you have opened the httpd.conf file, look for #LoadModule vhost_alias_module modules/mod_vhost_alias.so and take out the #, this will enable the vhost module which is what we’ll be using in the next step.
Step four
Now you can set up your first WordPress site directly on your local server. There are two ways to do this and I will show you each one, but the second is the more preferred and more dynamic way. The first we can do this is by simply clicking on the green icon in your taskbar, and going to Apache > alias directories and adding a new directory such as http://localhost/yoursite. Afterwards you would simply go click on the green icon again and click on www directory. Here you will get an Explorer window where all of your sites folders are listed. Simply create a new folder with the same name as your alias such as "yoursite” and you're done. One of the major problems with this method is with the URLs, especially dynamic URLs that are generated by WordPress. Using localhost can cause you to get lost in dynamic sites, it just doesn't look as natural, it can also cause confusion because it looks like everything is in a subdirectory.
The second method is to use the virtual host which we enabled earlier in the httpd.conf file. This method is also pretty simple, looks more natural and I believe it handles dynamic URLs much better. J
Just open your httpd.conf file and start configuring from there. Search the file until you find:
One of the major problems with this method is with the URLs, especially dynamic URLs that are generated by WordPress. Using localhost can cause you to get lost in dynamic sites, it just doesn't look as natural, it can also cause confusion because it looks like everything is in a subdirectory.
The second method is to use the virtual host which we enabled earlier in the httpd.conf file. This method is also pretty simple, looks more natural and I believe it handles dynamic URLs much better. J
Just open your httpd.conf file and start configuring from there. Search the file until you find:
ServerName localhost
DocumentRoot "I:/wamp/www/"
Here is where you will put all of your virtual host directories. To add a new site simply copy the above code and change the information to something like:
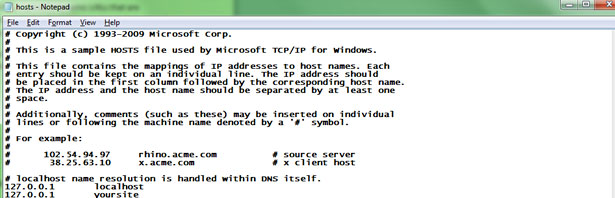
ServerName yoursite.dev
DocumentRoot "I:/wamp/www/yoursite/"
Then save your httpd.conf file. After you've done that, click on the green WAMPSERVER icon again and go to your www directory. Create a new folder and call it something like "yoursite". Next go into My Computer and C:\Windows\System32\drivers\etc, here you should see your host file. Right-click on the file and open with notepad, and directly under where it says “127.0.0.1 localhost” create a host name for your new site such as “127.0.0.1 yoursite”.
 At this point you are nearly finished, click on the WAMPSERVER icon again and restart all services. Now you can simply go into your browser and put www.yoursite.dev into your address bar. You won't see anything right now except for a blank page but at least you know it's working. If it's not working then retrace your steps and make sure you didn't miss something.
Step five
Now go to www.WordPress.org and download the latest version, save it into your local WAMPSERVER www directory and extract everything in the zip file to that folder. After downloading WordPress, click on the WAMPSERVER icon again and open phpMyAdmin. Once inside phpMyAdmin, create a new database by clicking on the databases tab and entering a database name in the space at the bottom of the page. For easy recognition will just name this "yoursite". After your database is set up, click on the WAMPSERVERicon again and restart all services.
 As you notice your database will be empty but we’ll fill it up real quickly when installing WordPress.
Now go into your WAMPSERVER www directory and open the "yoursite" folder and find wp-config in the main directory. Open the file in your HTML or PHP editor such as Notepad++ and set the following information:
As you notice your database will be empty but we’ll fill it up real quickly when installing WordPress.
Now go into your WAMPSERVER www directory and open the "yoursite" folder and find wp-config in the main directory. Open the file in your HTML or PHP editor such as Notepad++ and set the following information:
// ** MySQL settings - You can get this info from your web host ** //

/** The name of the database for WordPress */

define('DB_NAME', yoursite);

/** MySQL database username */

define('DB_USER', 'root');

/** MySQL database password */

define('DB_PASSWORD', '');

/** MySQL hostname */

define('DB_HOST', 'localhost');
If you have set a password for phpMyAdmin then go ahead and set it in the appropriate place, otherwise leave it blank.
Save the config file and now you can go into your browser, put in www.yoursite.dev and you should see the WordPress installation page. If you used the wp-config-sample file then take out the word -sample and simply save it as wp-config.
At this point go ahead and enter your information in the WordPress installation page and click install.
 After installing WordPress, go back to phpMyAdmin and you should see your database with 11 tables.
 Now proceed by logging into WordPress and go to settings, here you should see all of your initial information filled in for you.
If you have done everything correctly, you should have a brand-new WordPress installation and now you're ready to begin working on your local website.
Now proceed by logging into WordPress and go to settings, here you should see all of your initial information filled in for you.
If you have done everything correctly, you should have a brand-new WordPress installation and now you're ready to begin working on your local website.
Summary
Now that you understand how to set up and use a local server for WordPress, it's time to start using it and get familiar. There are many benefits to this including the fact that it is never a good idea to work on your website on a live server unless you're testing it for a client, plus your workflow is so much faster. This is poor practice, so you will be happy to know the ways of the local server. Do you use your own local installation of WP for development and testing? Let us know your experiences in the comments!Justin Hubbard
Justin Hubbard has been helping businesses since 2007 by creating timeless, memorable logos as part of a branding package and modern, user-friendly websites.


Read Next

15 Best New Fonts, July 2024
Welcome to our monthly roundup of the best fonts we’ve found online in the last four weeks. This month, there are fewer…
By Ben Moss

20 Best New Websites, July 2024
Welcome to July’s round up of websites to inspire you. This month’s collection ranges from the most stripped-back…

Top 7 WordPress Plugins for 2024: Enhance Your Site's Performance
WordPress is a hands-down favorite of website designers and developers. Renowned for its flexibility and ease of use,…
By WDD Staff

Exciting New Tools for Designers, July 2024
Welcome to this July’s collection of tools, gathered from around the web over the past month. We hope you’ll find…

3 Essential Design Trends, July 2024
Add some summer sizzle to your design projects with trendy website elements. Learn what's trending and how to use these…

15 Best New Fonts, June 2024
Welcome to our roundup of the best new fonts we’ve found online in the last month. This month, there are notably fewer…
By Ben Moss

20 Best New Websites, June 2024
Arranging content in an easily accessible way is the backbone of any user-friendly website. A good website will present…

Exciting New Tools for Designers, June 2024
In this month’s roundup of the best tools for web designers and developers, we’ll explore a range of new and noteworthy…

3 Essential Design Trends, June 2024
Summer is off to a fun start with some highly dramatic website design trends showing up in projects. Let's dive in!

15 Best New Fonts, May 2024
In this month’s edition, there are lots of historically-inspired typefaces, more of the growing trend for French…
By Ben Moss

How to Reduce The Carbon Footprint of Your Website
On average, a web page produces 4.61 grams of CO2 for every page view; for whole sites, that amounts to hundreds of KG…
By Simon Sterne

20 Best New Websites, May 2024
Welcome to May’s compilation of the best sites on the web. This month we’re focused on color for younger humans,…