 One of the primary reasons for WordPress' continued popularity is the ease with which it can be extended and customized with plugins.
Building a plugin may seem like an impossible task, but it's simpler than you may think. Today we begin our "Building your first WordPress plugin" series that will cover the most important principles and how-tos of the process.
By the end of the series you'll be fully prepared to make further experiments of your own, relying on best practices and conventions adopted by the extensive WordPress community.
What is a WordPress plugin?
It is a PHP script that modifies or extends the native functionality of WordPress.
By providing a very simple but flexible Plugin API, WordPress supplies every developer with following advantages for plugin usage:
- No need to modify core files to have additional or alternative functionality. This means that the plugin functionality can be preserved through core updates
- WordPress has a built-in mechanism of plugin deactivation when a fatal error could potentially break a site
- The modularity of code for a particular project increases; updates and maintenance become easier
- Plugin functionality is separated from themes
- The same plugin could be used with different themes and has some design-independent functionality
- Extended code base
- As a PHP script, a plugin can implement modern programming techniques, OOP for example, but at the same time it possesses the ability to use native WordPress functions, classes and APIs.
Regardless of your PHP coding experience — yours truly wrote her first plugin just after finishing a "PHP for Dummies" book — you are one small step away from the creating your first plugin for WordPress. Let's take that step together.
The primary task that we are going to explore today, is to build a solid plugin foundation. This foundation has to meet WordPress requirements and make the plugin recognizable by the core. At the same time it should follow common practices and conventions, accepted by community, to avoid possible conflicts with other plugins that might be installed on a site.
Plugin name and files
First of all, you need to ensure your plugin's name is unique. Even if you are not going to make your work a public release, you at least have to be sure that there is no possibility of your own site using two plugins with the same name. The simple plugins repository (and Google) search is your friend when avoiding the wrong choice.
To increase the probability of a name being unique many developers create the brand prefix, which is an abbreviation of developer's name (or nickname). This prefix with short reference to the plugin's name should subsequently be used everywhere — in names of files, functions, classes, variables etc. That helps to avoid naming conflicts with other plugins, themes and the core itself.
Let's start with an example. We adopt the name "Hello World Plugin" and to increase the chances of being unique we use "My super prefix" converted into abbreviation "MSP". Which gives us the truly unique name "MSP Hello World Plugin"; searching through the plugins repository confirms that no one else is using that.
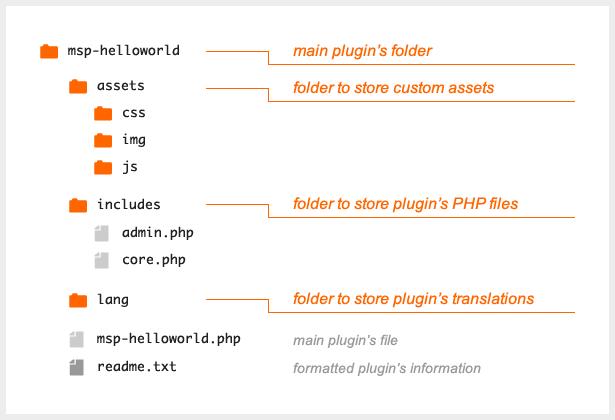
Our next step is to create the plugin's files. It's highly recommended that you store them in a separate folder inside a dedicated plugin folder. This folder should be named in accordance with plugin itself, in our case it could be 'msp-helloworld'. The folder should include the main plugin file with the same name: 'msp-helloworld.php'.
The WordPress Codex also recommends that you include a readme.txt file. This file contains the information about your plugin in a standardized format. If you are going to submit your plugin to the WordPress repository, the existence of the readme.txt is obligatory. But don't think about it as a burden, there are plenty of benefits to doing this.
If your plugin is supposed to have multiple files or load some assets (images, css and js files), they should be organized in sub-folders. Proper file organization is a sign of professional work. You can rely on following pattern:

Plugin header
Every plugin should have the obligatory header. It helps WordPress recognise the script as a valid plugin and output proper information on the plugins' management screen.
This header is a PHP comment block located at the top of the main plugin's file:
/*
Plugin Name: MSP Hello World
Description: Create hello world message
Version: 1.0
Author: Author's name
Author URI: http://authorsite.com/
Plugin URI: http://authorsite.com/msp-helloworld
*/
The header's information will be presented in the corresponding plugin's row on the management screen.

The order of the lines is not important, but the file has to be in UTF-8 encoding.
Note that it's important to be consistant with the version numbering pattern you've chosen (e.g. x.x.x), for the WordPress upgrade mechanism to detect it correctly.
Paths to files
So far we've created different files for our plugin (in proper sub-folders), we now need to determine the correct paths (or URLs) to them inside the plugin code. Taking into consideration the fact that the wp-content folder could be moved from its default location, it becomes clear that paths to plugin files should not be hardcoded, but rather, should be detected.
WordPress has two functions, plugin_dir_path and plugin_dir_url to address the issue, but we can go further by using the following trick:
define('MSP_HELLOWORLD_DIR', plugin_dir_path(__FILE__));
define('MSP_HELLOWORLD_URL', plugin_dir_url(__FILE__));
With this little snippet (included in the main plugin file) we detect the path and URL to our plugin's folder inside the WordPress installation and assign them to appropriate constants. After that we can use these constants in combination with known relative paths to sub-folders, for example MSP_HELLOWORLD_DIR.'assets/img/image.jpg'.
Using these constants we can also easily include plugin files from sub-folders inside the main file:
function msp_helloworld_load(){

 if(is_admin()) //load admin files only in admin
 require_once(MSP_HELLOWORLD_DIR.'includes/admin.php');

 require_once(MSP_HELLOWORLD_DIR.'includes/core.php');
}
msp_helloworld_load();
Plugin states
After installation our plugin could be in an active or inactive state.
Active state means that it was activated by the user and its code will be executed by WordPress every time a page is requested.
The plugin could also be deactivated by the user which it means that files are kept in their places, but the code is not executed.
(The plugin could also be completely uninstalled by a user, meaning that the files are deleted from the plugins folder.)
WordPress can catch changes to these states and execute some code scheduled for such changes. If any code is scheduled for activation or deactivation, it will be executed only at this particular moment, not on every page load.
For example, if the plugin is supposed to manipulate with rewrite rules it should clear them on activation/deactivation. If the plugin creates some entries in a database, for example by storing options, the healthy practice is to delete them, when plugin is uninstalled.
How can it be done?
For activation and deactivation actions we can register a so-called 'activation hook' and 'deactivation hook'. They're just a piece of code that tells WordPress to execute one particular function on activation and another particular function on deactivation. Here's an example of such code:
register_activation_hook(__FILE__, 'msp_helloworld_activation');
register_deactivation_hook(__FILE__, 'msp_helloworld_deactivation');

function msp_helloworld_activation() {

	//actions to perform once on plugin activation go here
}

function msp_helloworld_deactivation() {
	// actions to perform once on plugin deactivation go here
}
For uninstall actions we have two alternatives.
One option is to create an uninstall.php file in the plugin's folder (along with main plugin file and readme.txt) and include all required code there. If an uninstall.php exists, WordPress will execute it automatically when the plugin is deleted by the user. Alternatively, we can register an uninstall hook in almost the same way as we did with the activation and deactivation hooks. The tricky part is to call it only once, on activation. Here is an example:
register_activation_hook(__FILE__, 'msp_helloworld_activation');

function msp_helloworld_activation() {

 //actions to perform once on plugin activation go here

 //register uninstaller
 register_uninstall_hook(__FILE__, 'msp_helloworld_uninstall');
}

function msp_helloworld_uninstall(){

 //actions to perform once on plugin uninstall go here
}
It's important to know that only one of the alternatives described will work: if uninstall.php exists, it will be executed and any uninstall hook will not be fired.
Best practices
Summarizing everything above, here's an overview of creating a solid foundation for a WordPress plugin:
- Find a unique name
- Setup a prefix (related to your brand)
- Create the plugin's folder
- Create sub-folders for PHP files, assets, and translations
- Create the main plugin file and fill in obligatory header information
- Create a readme.txt file
- Use proper constants and functions to detect paths to plugin files
- Create additional PHP files and include them inside the main one
- Create activation and deactivation functions
- Create an uninstall script
Conclusion
After all these steps you're ready to actually make your plugin to do something by creating its code. We'll get acquainted with some useful concepts that make WordPress plugins exciting and flexible in the next article of this series. But some important aspects can be highlighted right now:
- Don't ever develop without debugging. There is plenty of information about the WordPress debugging mode and various plugins to get extra notifications. They are your reliable assistants on the way to error-free and up-to-date code.
- Prefix everything. Use a unique prefix (usually the plugin's name derivative) for all your functions, variables, classes etc. to ensure your plugin is interoperable with other developer's work.
- Follow WordPress coding standards. These standards are a set of rules implemented by the core team for all WordPress code to make it easy to read and maintain. Following these standards helps maintain the consistency of the core code within your plugin.
- Use core functions, APIs and classes for common tasks. WordPress provides developers with a wide range of tools for commonly required operations (like database interaction or user authentication), so that you can concentrate on the truly unique functionality of your plugin.
- Document your code. Actually there isn't much to say about this principle — regardless of the conventions used, both you as a developer and we as a community benefit from well-documented code.
I hope this introductory information inspire you to start developing with WordPress. Look out for the next part of the series in the near future.
Click here to download our "Hello World" plugin example to use as skeleton for your own development.
What tips would you add to this introduction? What would you like to see covered in the next article in the series? Let us know in the comments!


