
Blogging is an incredibly rewarding experience; it’s one of the few times in life that you truly reap what you sow. Write a great post, and readers will find it, churn out the same old opinions as everyone else, and you’ll get lost in the crowd.
There are some excellent platforms to blog on: WordPress.com, Ghost.org, Medium.com. But if you’re serious about blogging, eventually you’re going to need to take control of your own content. There are tons of benefits to controlling your own content. Firstly, you’re your own boss, no one can censor you; Secondly, you decide if there’s advertising on your post, and if there is, it’s you that profits; Thirdly, you have total control of your site, you can change platforms, redesign, customize the code, as much as you please; And perhaps most importantly, there’s the pride of ownership of saying “This little part of the web is my corner.”Step 1: Choosing a host
Starting your own website might sound like a big step, but really anyone can do it. Companies like Hostgator are set up to make it as simple as possible. The first step is to choose a hosting package. Hosting is space on a webserver. That’s where you’ll store all your text, images, and videos too if you have them. Hostgator has several shared hosting plans. Shared-hosting means that your space will be on the same server as other people’s space, instead of having a whole server to yourself—think of it like renting an apartment, rather than renting an entire building. (Who knows, maybe one day you’ll need that whole building, but starting out, a few rooms will do.) Sometimes it’s tricky deciding which package to choose, but there’s no need to over-commit. Sign-up to the lowest priced package you can. Remember, you can always upgrade later if you need SSL, or want to start a second blog.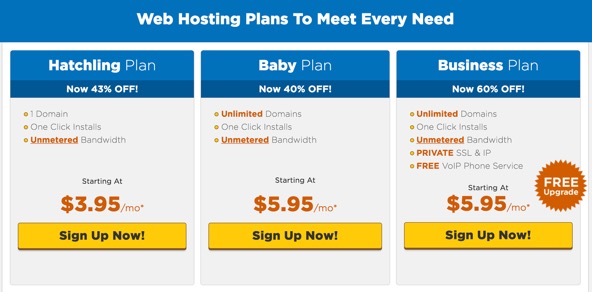 Hostgator’s most popular plan is their Baby Plan, because it allows you to run multiple blogs. But if this is your first foray online, then the Hatchling Plan is enough for you.
Hostgator’s plans come with unlimited storage and email addresses. You’ll also find that they include a drag-n-drop website builder (you might have heard that called a WYSIWYG, or What You See Is What You Get) so you can build your own site without the help of a web designer. You even get a Google Adwords and Yahoo/Bing credit, so you can advertise your blog.
Once you’ve chosen just click the “Sign Up Now” button and follow the instructions on screen.
Hostgator’s most popular plan is their Baby Plan, because it allows you to run multiple blogs. But if this is your first foray online, then the Hatchling Plan is enough for you.
Hostgator’s plans come with unlimited storage and email addresses. You’ll also find that they include a drag-n-drop website builder (you might have heard that called a WYSIWYG, or What You See Is What You Get) so you can build your own site without the help of a web designer. You even get a Google Adwords and Yahoo/Bing credit, so you can advertise your blog.
Once you’ve chosen just click the “Sign Up Now” button and follow the instructions on screen.
Step 2: Register a domain
A domain name is how people find you online. You need a good one if you’re going to stand out. You want it to be memorable, but unfortunately most short domains, such as “mykickassblog.com” have already been registered. Think up some names, things that are personal to you might be more likely to be available. But remember, if you use something really crazy, and you go viral you might be stuck with it! Do you really want tell your bank manager that your business’ name is thepurplefrogsbingbong.com? Hostgator have a tool to help you find a domain. Just type in your preferred choice and click “Search”, it will tell you if the domain is available.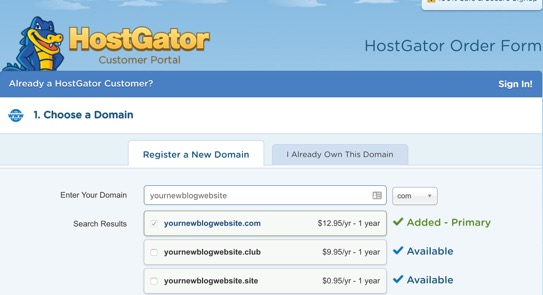 It’s perfectly okay to register a domain with one company and have your hosting with another. But, if you do that you’ll be responsible for things like maintaining DNS records, and that’s server-admin level complexity. By registering your domain in the same place as your hosting, Hostgator takes care of everything for you.
Once you’ve picked your domain, you probably want to check the Domain Privacy Protection. Normally, when you register a domain, you have to tell ICANN who you are, and anyone can look up who owns the domain, including your address. If you use Hostgator’s Domain Privacy Protection your information is replaced with Hostgator’s. It’s still your domain, but no one can lookup your personal details.
Register the domain for as long as you want to (hosting is always annual) by following the on-screen instructions. Before the duration is up, you’ll need to renew to keep using the domain.
It’s perfectly okay to register a domain with one company and have your hosting with another. But, if you do that you’ll be responsible for things like maintaining DNS records, and that’s server-admin level complexity. By registering your domain in the same place as your hosting, Hostgator takes care of everything for you.
Once you’ve picked your domain, you probably want to check the Domain Privacy Protection. Normally, when you register a domain, you have to tell ICANN who you are, and anyone can look up who owns the domain, including your address. If you use Hostgator’s Domain Privacy Protection your information is replaced with Hostgator’s. It’s still your domain, but no one can lookup your personal details.
Register the domain for as long as you want to (hosting is always annual) by following the on-screen instructions. Before the duration is up, you’ll need to renew to keep using the domain.
Step 3: Installing WordPress
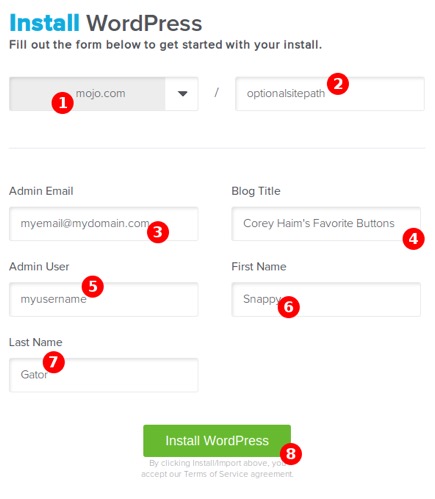
Amazingly, you own your own website! How awesome is that! Now it’s time to get your blog up and running. There are lots of blogging options, but the one chosen by most of the world is WordPress. It actually powers almost 1 in 5 websites, when people say blog, they often mean WordPress. Best of all, WordPress is free! Open up your email and find the welcome email that Hostgator have sent you. You’ll see that there’s a link to your cPanel (which is simply short for "Control Panel"). Use the username and password provided and log in to your cPanel. Look for the “Quick Install” button, and click it. Then, find the “Popular Installs”, you’ll see that WordPress is at the top.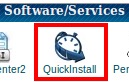 Click on “WordPress” and fill out the form. You can change these details later, but it’s important that you don’t use the same username as your cPanel username (because two username/password combinations are more secure than one).
 When you’re ready, click “Install WordPress”.
 And that’s it! You’ve set up a website, and installed blogging software. All you need to do now is think of a topic for your first blog post. How about telling the world what inspired you to start blogging in the first place?
Blogging is an awesome adventure, good luck, and enjoy the ride!
[-- This is an advertorial post on behalf of Hostgator --]
And that’s it! You’ve set up a website, and installed blogging software. All you need to do now is think of a topic for your first blog post. How about telling the world what inspired you to start blogging in the first place?
Blogging is an awesome adventure, good luck, and enjoy the ride!
[-- This is an advertorial post on behalf of Hostgator --]
WDD Staff
WDD staff are proud to be able to bring you this daily blog about web design and development. If there's something you think we should be talking about let us know @DesignerDepot.
Read Next

15 Best New Fonts, July 2024
Welcome to our monthly roundup of the best fonts we’ve found online in the last four weeks. This month, there are fewer…
By Ben Moss

20 Best New Websites, July 2024
Welcome to July’s round up of websites to inspire you. This month’s collection ranges from the most stripped-back…

Top 7 WordPress Plugins for 2024: Enhance Your Site's Performance
WordPress is a hands-down favorite of website designers and developers. Renowned for its flexibility and ease of use,…
By WDD Staff

Exciting New Tools for Designers, July 2024
Welcome to this July’s collection of tools, gathered from around the web over the past month. We hope you’ll find…

3 Essential Design Trends, July 2024
Add some summer sizzle to your design projects with trendy website elements. Learn what's trending and how to use these…

15 Best New Fonts, June 2024
Welcome to our roundup of the best new fonts we’ve found online in the last month. This month, there are notably fewer…
By Ben Moss

20 Best New Websites, June 2024
Arranging content in an easily accessible way is the backbone of any user-friendly website. A good website will present…

Exciting New Tools for Designers, June 2024
In this month’s roundup of the best tools for web designers and developers, we’ll explore a range of new and noteworthy…

3 Essential Design Trends, June 2024
Summer is off to a fun start with some highly dramatic website design trends showing up in projects. Let's dive in!

15 Best New Fonts, May 2024
In this month’s edition, there are lots of historically-inspired typefaces, more of the growing trend for French…
By Ben Moss

How to Reduce The Carbon Footprint of Your Website
On average, a web page produces 4.61 grams of CO2 for every page view; for whole sites, that amounts to hundreds of KG…
By Simon Sterne

20 Best New Websites, May 2024
Welcome to May’s compilation of the best sites on the web. This month we’re focused on color for younger humans,…