 In the first part of this series, we presented stock photography from a marketing and advertising perspective.
You learned about different license types, the photo subjects most sought after by stock agencies, copyright, licensing and more.
In this second part, we'll present the technical and design aspect of stock photography. You, the photographer, will learn the technical skills necessary to improve the quality of your photos in order to be accepted on stock photography websites.
We'll cover photo composition, file formats, and post processing as well as a short list of insider tips.
Composition
There are times when we look at a photo and we say it's beautiful, but we can't say why that is. That is great composition.
Composition is the most important thing in stock photography, but every stock agency has its own guidelines that you should carefully read and examine. Composition, quality and professionalism go hand in hand from a stock agency's perspective.
Composition is not always as easy as adhering to several rules, because photography could be very subjective and photographers must use their creativity to transmit their messages through their photos.
As with every other aspect of stock photography, when you decide to take a photo for the purpose of submitting it to a stock website, you have to look at what others submitted and what works and what doesn't.
Stock agencies always welcome fresh new angles in photos where a little creativity is put into that photo and not just the same old boring shot-from-the-front angle. The best way to find fresh angles is to experiment and always think of how you can improve the composition you're about to shoot. If you're shooting a flower, try to get on the same level as the flower or shoot far above it.
Of course there are a few rules to keep in mind that it will greatly help improve your chance to be successful with stock websites, but one particular rule tends to be more important than the rest:
1. The Rule of Thirds
According to Wikipedia the Rule of Thirds states that "an image should be imagined as divided into nine equal parts by two equally-spaced horizontal lines and two equally-spaced vertical lines, and that important compositional elements should be placed along these lines or their intersections".
Essentially it's not a good idea to put your subject in the center of your photo, because it would create a snap shot instead of a professional photo. Always to imagine these horizontal and vertical lines when taking shots.
2. Taking Tack Sharp Photos
"Tack sharp photos" is the term that photographers use when they talk about the sharpest photos that you can take with a camera and a lens.
These little things set the professional photographers apart from the amateurs and stock agencies love these.
If you're thinking it's not necessary to use a tripod to achieve tack sharp photos, then you're on the wrong path. A tripod is essential for sharp photos.
You have to eliminate every little vibration of the camera that might prevent taking sharp photos, but using a tripod is not enough. Simply touching the camera and pressing the shutter button can cause tiny vibrations that will be transferred to the photo. To prevent this, use a cable release. Every digital SLR camera nowadays has this feature, so you can easily attach a remote control to it, either wired or wireless. If you don't want to or cannot use a remote control, the next best thing is to use the camera's self timer.
Now, the following statements may sound a little silly. If you set up your camera on a tripod and you have a lens with image stabilization or vibration reduction, turn this feature off.
Let me explain why: Manufactures created this feature for situations where your hand holds the camera, but in situations where the camera sits on a tripod and it's absolutely still, you should turn the image stabilization off to prevent the lens from looking for vibrations in the image. By looking for vibrations, it creates a slight movement in the lens, enough to cause a distortion on the photo.
3. File formats
Many beginner photographers ask this question: What is the best file format for photographs? From a stock agency's points of view, they recommend file formats that preserve the best quality of the photo.
There are a few commonly used file formats that are also available in digital cameras: Jpeg (JPG), PNG, TIFF and RAW.
The file format requirements usually varies on each stock photography website, but there are a few common steps that you should bear in mind in order to maximize your photo's quality, which in turn will translate to a successful submission.
The RAW file format is the best to use when taking your photos, but stock agencies don't accept it simply because it has several disadvantages: Firstly, the file size is too large. A typical RAW image file starts at around 14-15 MB. Secondly, each camera manufacturer's RAW file format is different. It would be a tedious job for stock agencies to sort through these formats, therefore they simply don't accept RAW files.
A RAW file preserves all of the information that the lens passes to the camera's computer, everything from color space to EXIF information. Usually it's the way to shoot the best quality photos and it's also good for post processing too.
The Jpeg file format uses the lossy compression methods, meaning that not every piece of information is preserved when saving the photo, and it cripples the quality too, but stock agencies usually prefer this file format.
The best a photographer can do is to shoot photos in the RAW image format, post process it, tweak it and then convert it into a Jpeg with 100% compression quality.
4. Improving Photo Quality (Post Processing)
For a quality photo, the post processing work should be the absolute minimal, of course not every time we can get away with beautiful photos, so we need to tweak it here and there.
I will present the most common problems that a photographer will encounter and how to fix them, in order to get submitted on stock photography websites.
4.1. Noise Reduction
To keep this problem to the minimal or non-existent, you should think of this before you shoot your photos by setting your camera to the lowest ISO speed.
ISO speed is the camera's sensitivity to light, the higher this number the more sensitive the lens is. This number can range from as low as 50 to as high as even 8000 on really expensive dSLR cameras. If the ISO is set to a high number, the noise which appears on the photos won't be acceptable for stock photo submissions.
Given the fact that that we can't always set the lowest ISO considering weather conditions (e.g. rainy day, cloud shade, etc.) we could post process the image to reduce this noise and improve the photo's overall quality.
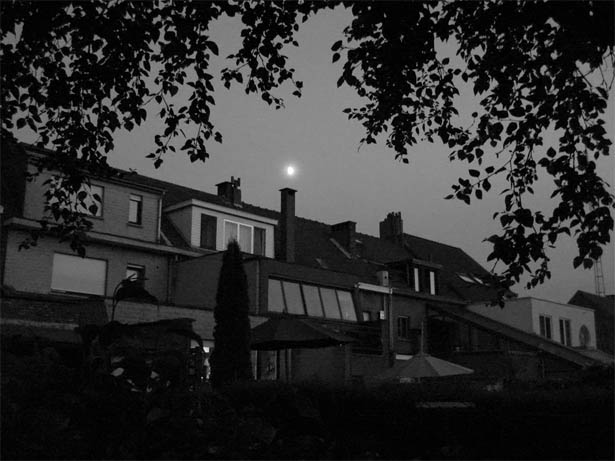
Luckily Adobe Photoshop CS3 has a really good noise reduction filter. Consider this image:
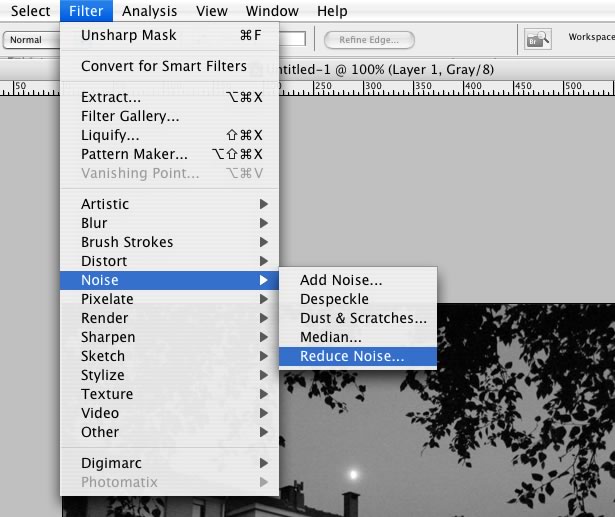
In Photoshop go to Filter -> Noise -> Reduce Noise
Set the following values, strength 8, preserve details 75%, sharpen details 30%
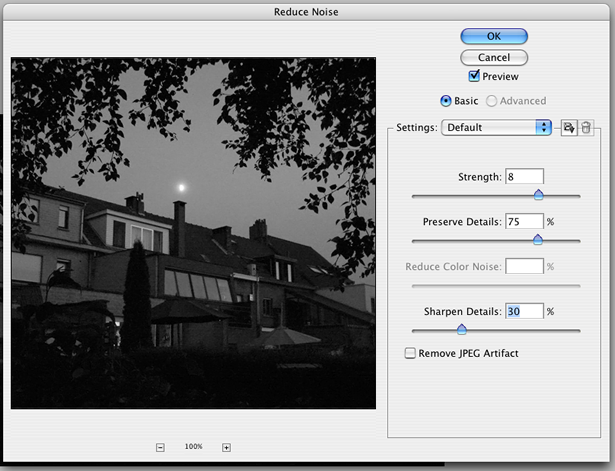
The result is shown below. You can clearly see the image is smoother and the noise is reduced significantly.
This technique is fairly simple. You can find a more complex and effective method at cambridgeincolour.com/tutorials/image-averaging-noise.htm using the Image Averaging technique.
4.2. Resolution Change
This is not really a post processing technique, but a good tip that you should always take into consideration. Always shoot at the camera's highest resolution and you can then reduce the resolution if necessary in Photoshop. To do this, go to Image -> Image Size.
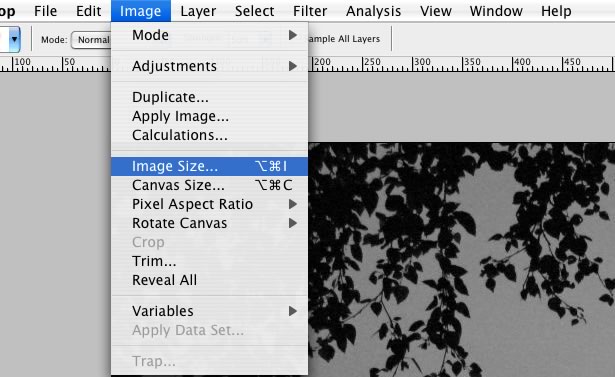
One important thing to mention here: don't ever scale up your photos, because this will result in mediocre quality. Stock agencies will notice this and reject them.
4.3. Sharpness
I will show you a really cool trick that you can use to sharpen your photos by using the Unsharp Mask. The name is a little confusing, but this method works best for me and I consider this technique the best, because it's easy to apply, resulting in significant improvements.
Let's take the following image:
We need to change the Image Mode first, so go to Image -> Mode and choose Lab Color
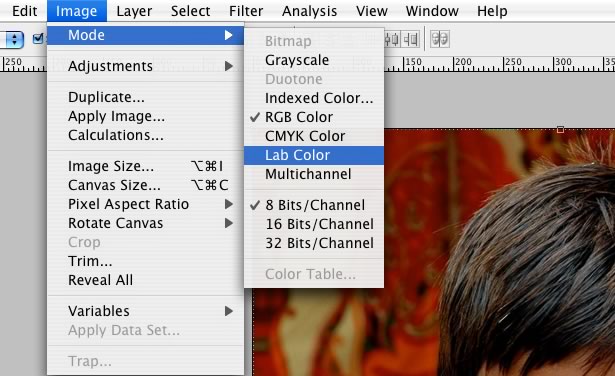
Go to the Channels palette and select the Lightness channel. (If you can't find the channels palette on the right then go to Window -> Channels to open that window).

Go to Filters -> Sharpen -> Unsharp Mask and adjust the values as you see fit.
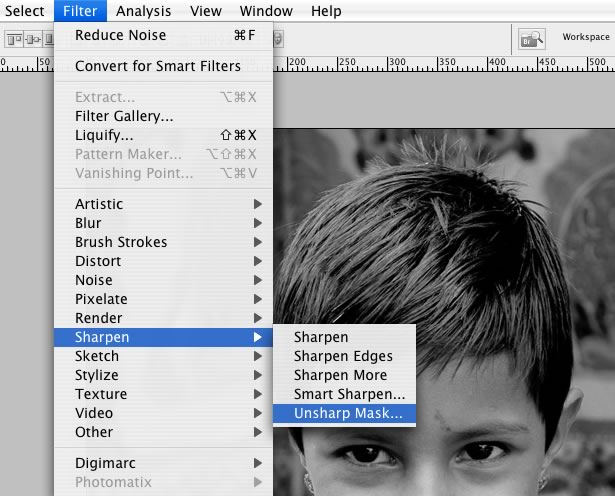
Usually, for portraits, the following values works best for me: Amount 130%, Radius 1, Thresold 10
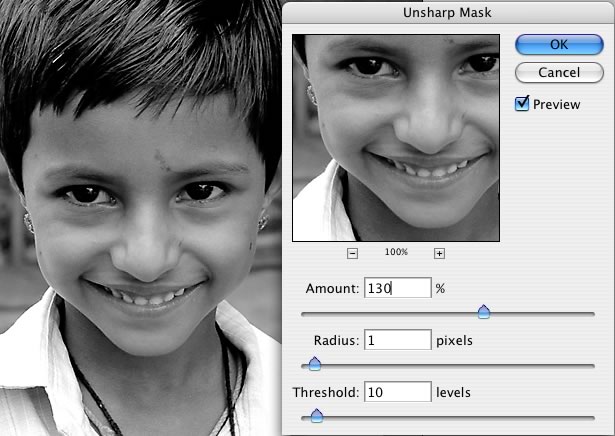
Switch the Image Mode back to RGB by going to Image -> Mode -> RGB. You can see the final result below.

5. Insider Tips
- Always think before taking a shot. Are the light conditions good? Is the subject framed correctly?
- Think of the following rules: Rule of thirds, Golden Ratio, horizontal and vertical symmetry
- A little post processing won't harm anybody
- If you shoot portraits, always focus on the eyes. Make them pop out of the photo
- Use the highest resolution your camera will allow and always use the RAW file format
- Set the ISO as low as possible, even at night, and just put your camera on a tripod
- Don't post edit your images in JPEG or other lossy image file formats
- Avoid harsh shadows, distorted colors, under/over exposed images, purple fringing and lens flare
Please follow your own tips and tricks that you use to create great stock photos and leave your comments below...


